Configure a SIP Trunk
SIP Trunking
SIP trunks enable you to send and receive calls via SIP. You will want to configure a SIP trunk if you have a current external application, office PBX, or wholesale carrier connection. When calls are made to a phone number associated with a trunk group, the system routes them to the endpoint's public IP address.
SIP Trunking refers to configuring and connecting your SIP server with CarrierX SIP services.
In this guide, you will learn how to configure a SIP trunk. This guide goes over creating an endpoint, configuring a trunk group, and assigning a phone number. It also goes over configuring the endpoint for placing and receiving calls.
SIP trunks can be configured through the portal and programmatically.
Before You Start
There are three main components to understand when configuring a SIP trunk:
- Endpoint
- Trunk Group
- Trunk
Endpoint
An endpoint, for this discussion, is your public IP address(es) or domain name(s) used to receive and send calls. In CarrierX, SIP endpoints are known as Third Party endpoints.
Trunk Group
A trunk group is a group of trunks that are used to route calls to endpoints.
Phone numbers are assigned to trunk groups to route incoming calls to an endpoint.
Trunk groups support two types of routing that allow for routing calls to multiple endpoints: failover and round-robin. Failover routing sends calls to the highest priority endpoint first. If the call fails, the system will try the next highest priority endpoint. Round-robin can be used to distribute call traffic to multiple endpoints equally.
Trunk
A trunk is a virtual phone line that is used to route calls to an endpoint. Trunks are grouped into trunk groups. Each trunk is associated with a single endpoint.
Call Flow
When a call is placed from the PSTN, it first connects to the rented DID number assigned to the trunk group. Then it goes to the trunk group where a trunk is selected to pass the call further to the endpoint, and then to your external application.

Refer to our How It Works: Trunk Groups and Trunks section to learn more about what trunk groups and trunks are, what they are used for, and how you can work with them.
Prerequisites
Before you begin, ensure that:
- You have a CarrierX account
- You have access to the portal
- (For API setup) You have a valid API token
Create Using Portal
In this section, we will configure an endpoint through the portal, and then assign a trunk group. A trunk group routes phone numbers to an endpoint.
Note that a SIP trunk can also be configured programmatically, as is covered in a later section of this guide.
Step 1: Create an Endpoint
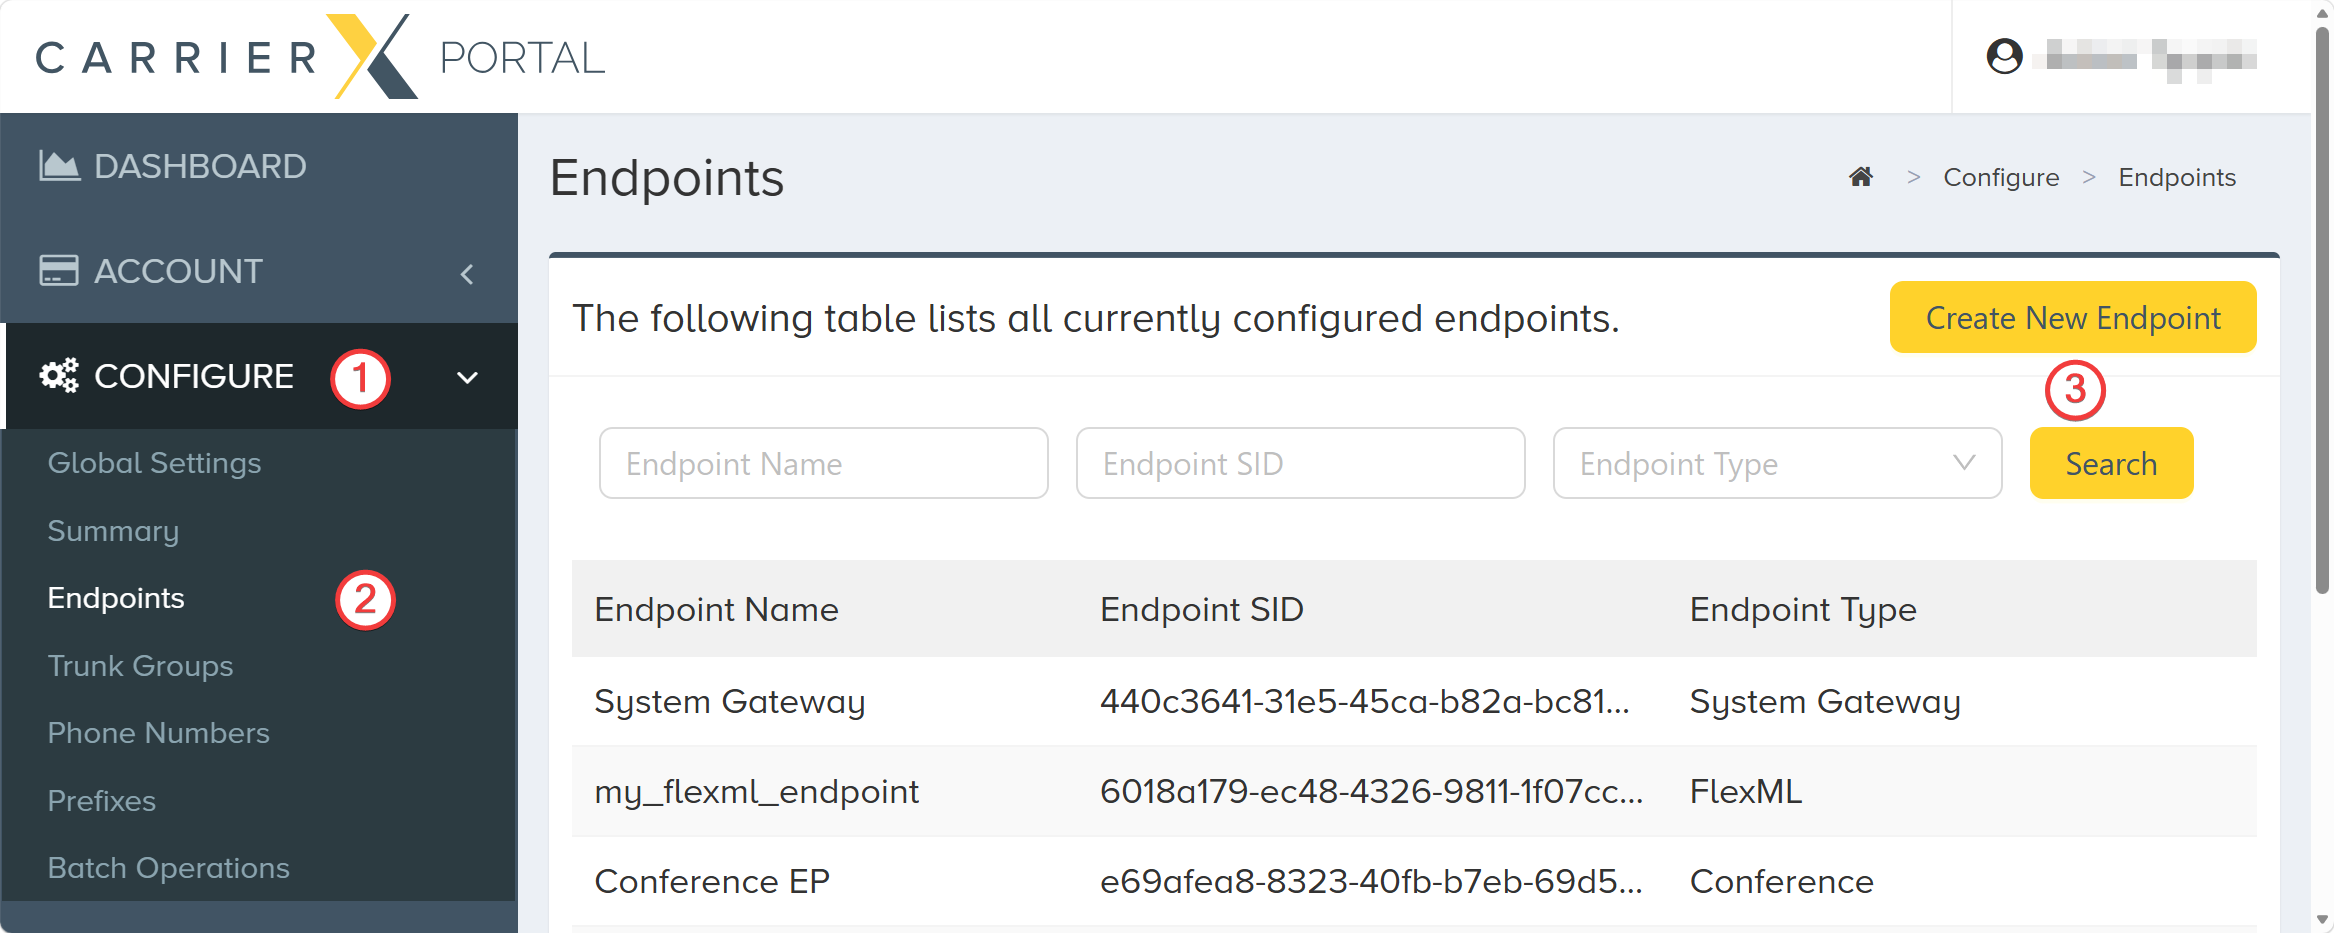
To set up a SIP trunk, log into your CarrierX account. On the left-side menu, click CONFIGURE > Endpoints. Click the Create New Endpoint button.
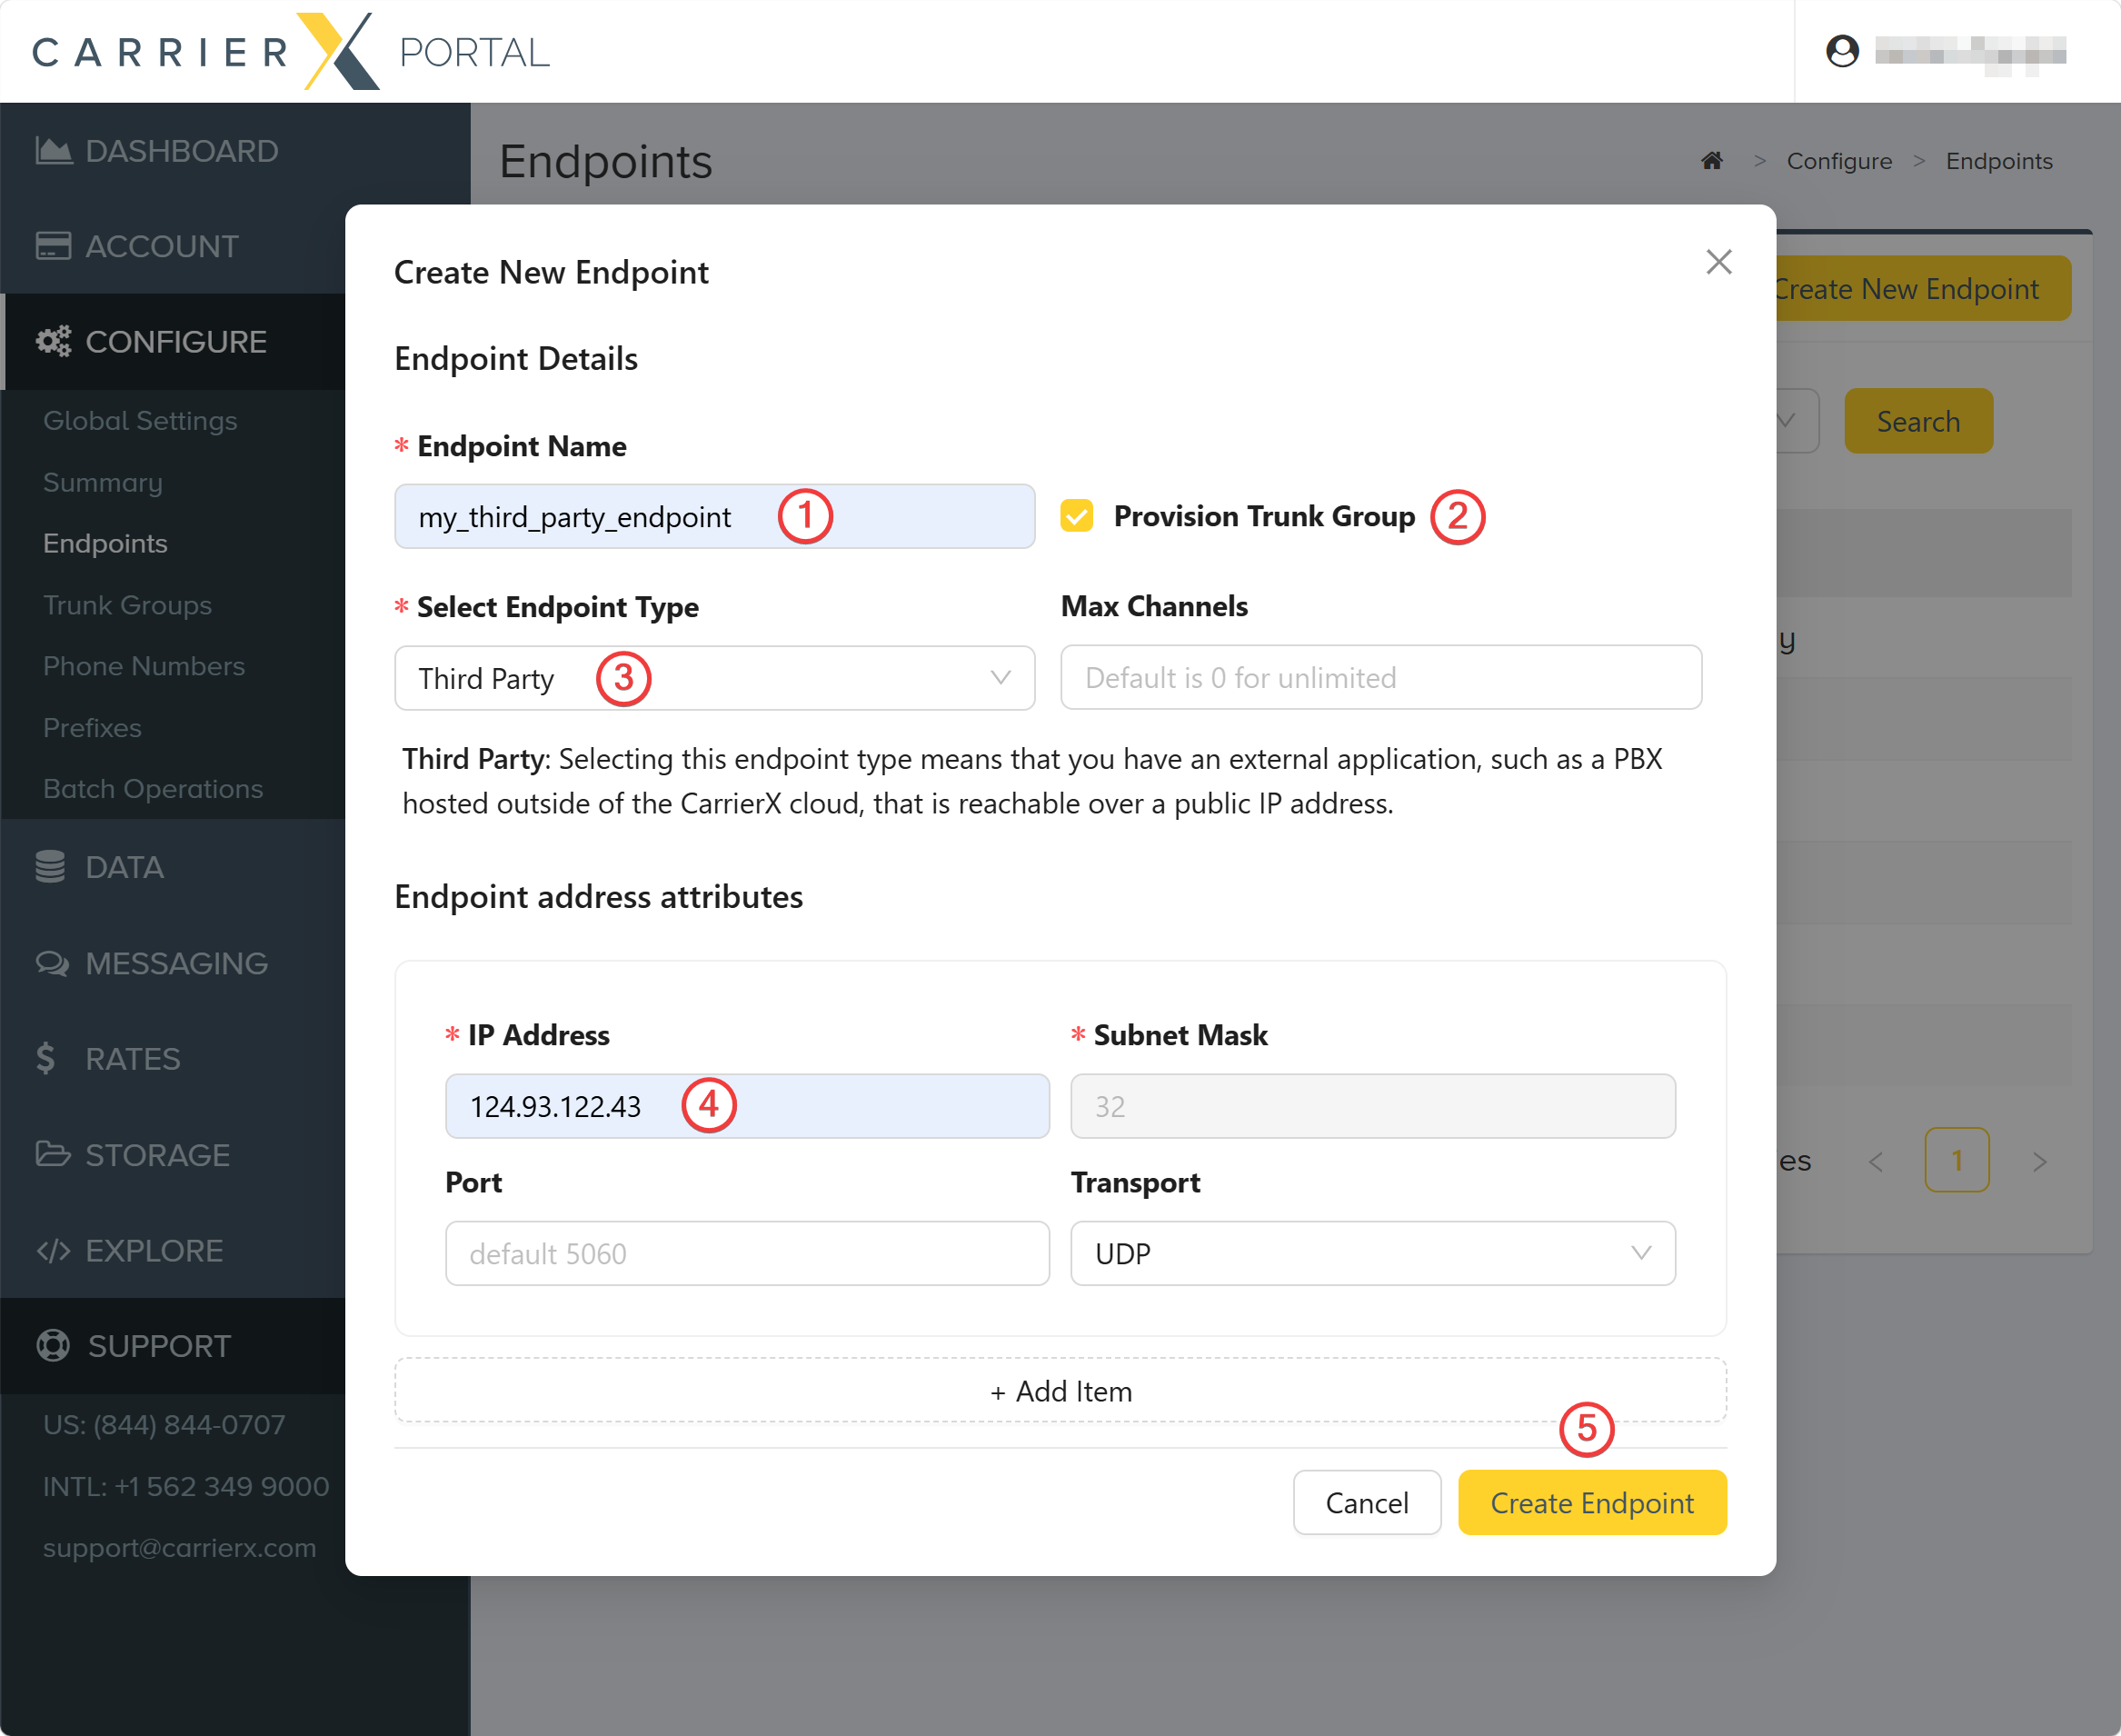
Enter a name for the new endpoint. This is a friendly name that is used for internal reference.
Step 2: Create a Trunk Group with Trunk
-
Check Provision Trunk Group to create a trunk group alongside the endpoint. A trunk group defines how calls are routed. Each trunk within the group connects to a specific endpoint. Incoming calls are matched to a trunk group based on the phone number, and then routed to the associated endpoint.
-
Select Third Party from the Select Endpoint Type dropdown menu.
-
Enter the public IP address of your SIP device. You can also add a port, otherwise it will default to
5060.
You must configure your firewall to allow traffic from the IP addresses defined in the System Gateway endpoint. This endpoint is automatically created by CarrierX and can be found in the Endpoints section of the portal.
- Click the Create Endpoint button.
Now that the endpoint and trunk group are created, assign a phone number to enable call routing.
Step 3: Select and Assign a Phone Number
Navigate to CONFIGURE > Phone Numbers.
Click a phone number that you would like to associate with the endpoint trunk group. If no phone numbers are listed, you must first rent one. Refer to the phone number rental flow in the portal before proceeding. In this case, we will use a phone number that we have already rented.
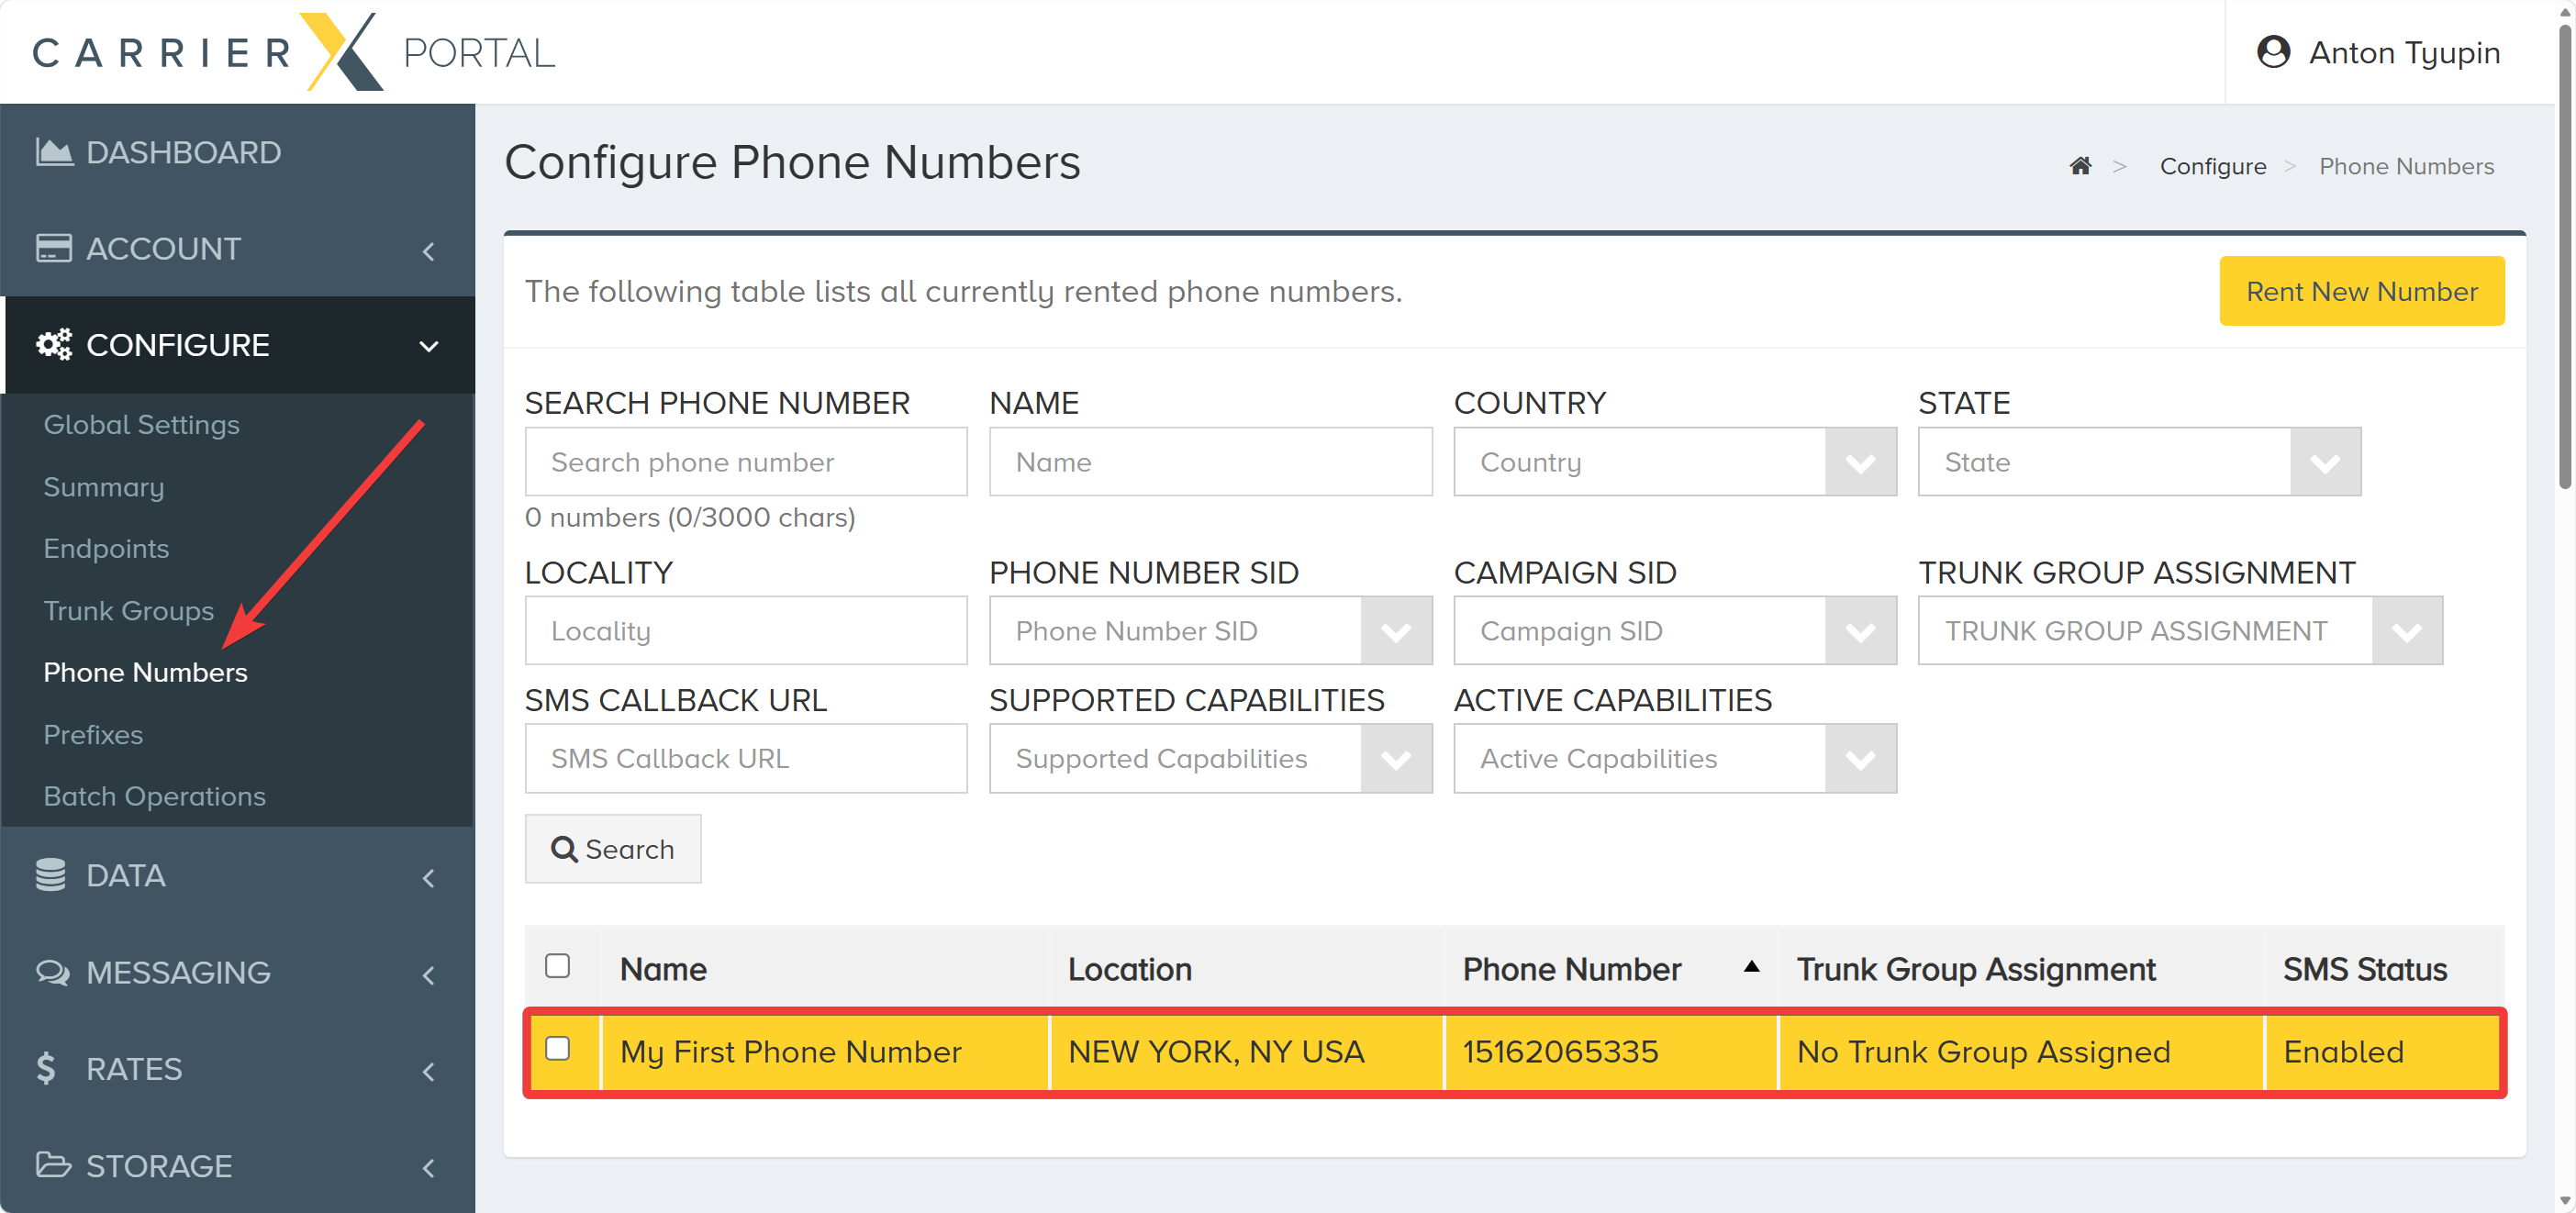
Once you have selected a phone number, scroll down to see the phone number details. Click Edit.
Select the trunk group you would like to assign to the phone number and Save your changes.
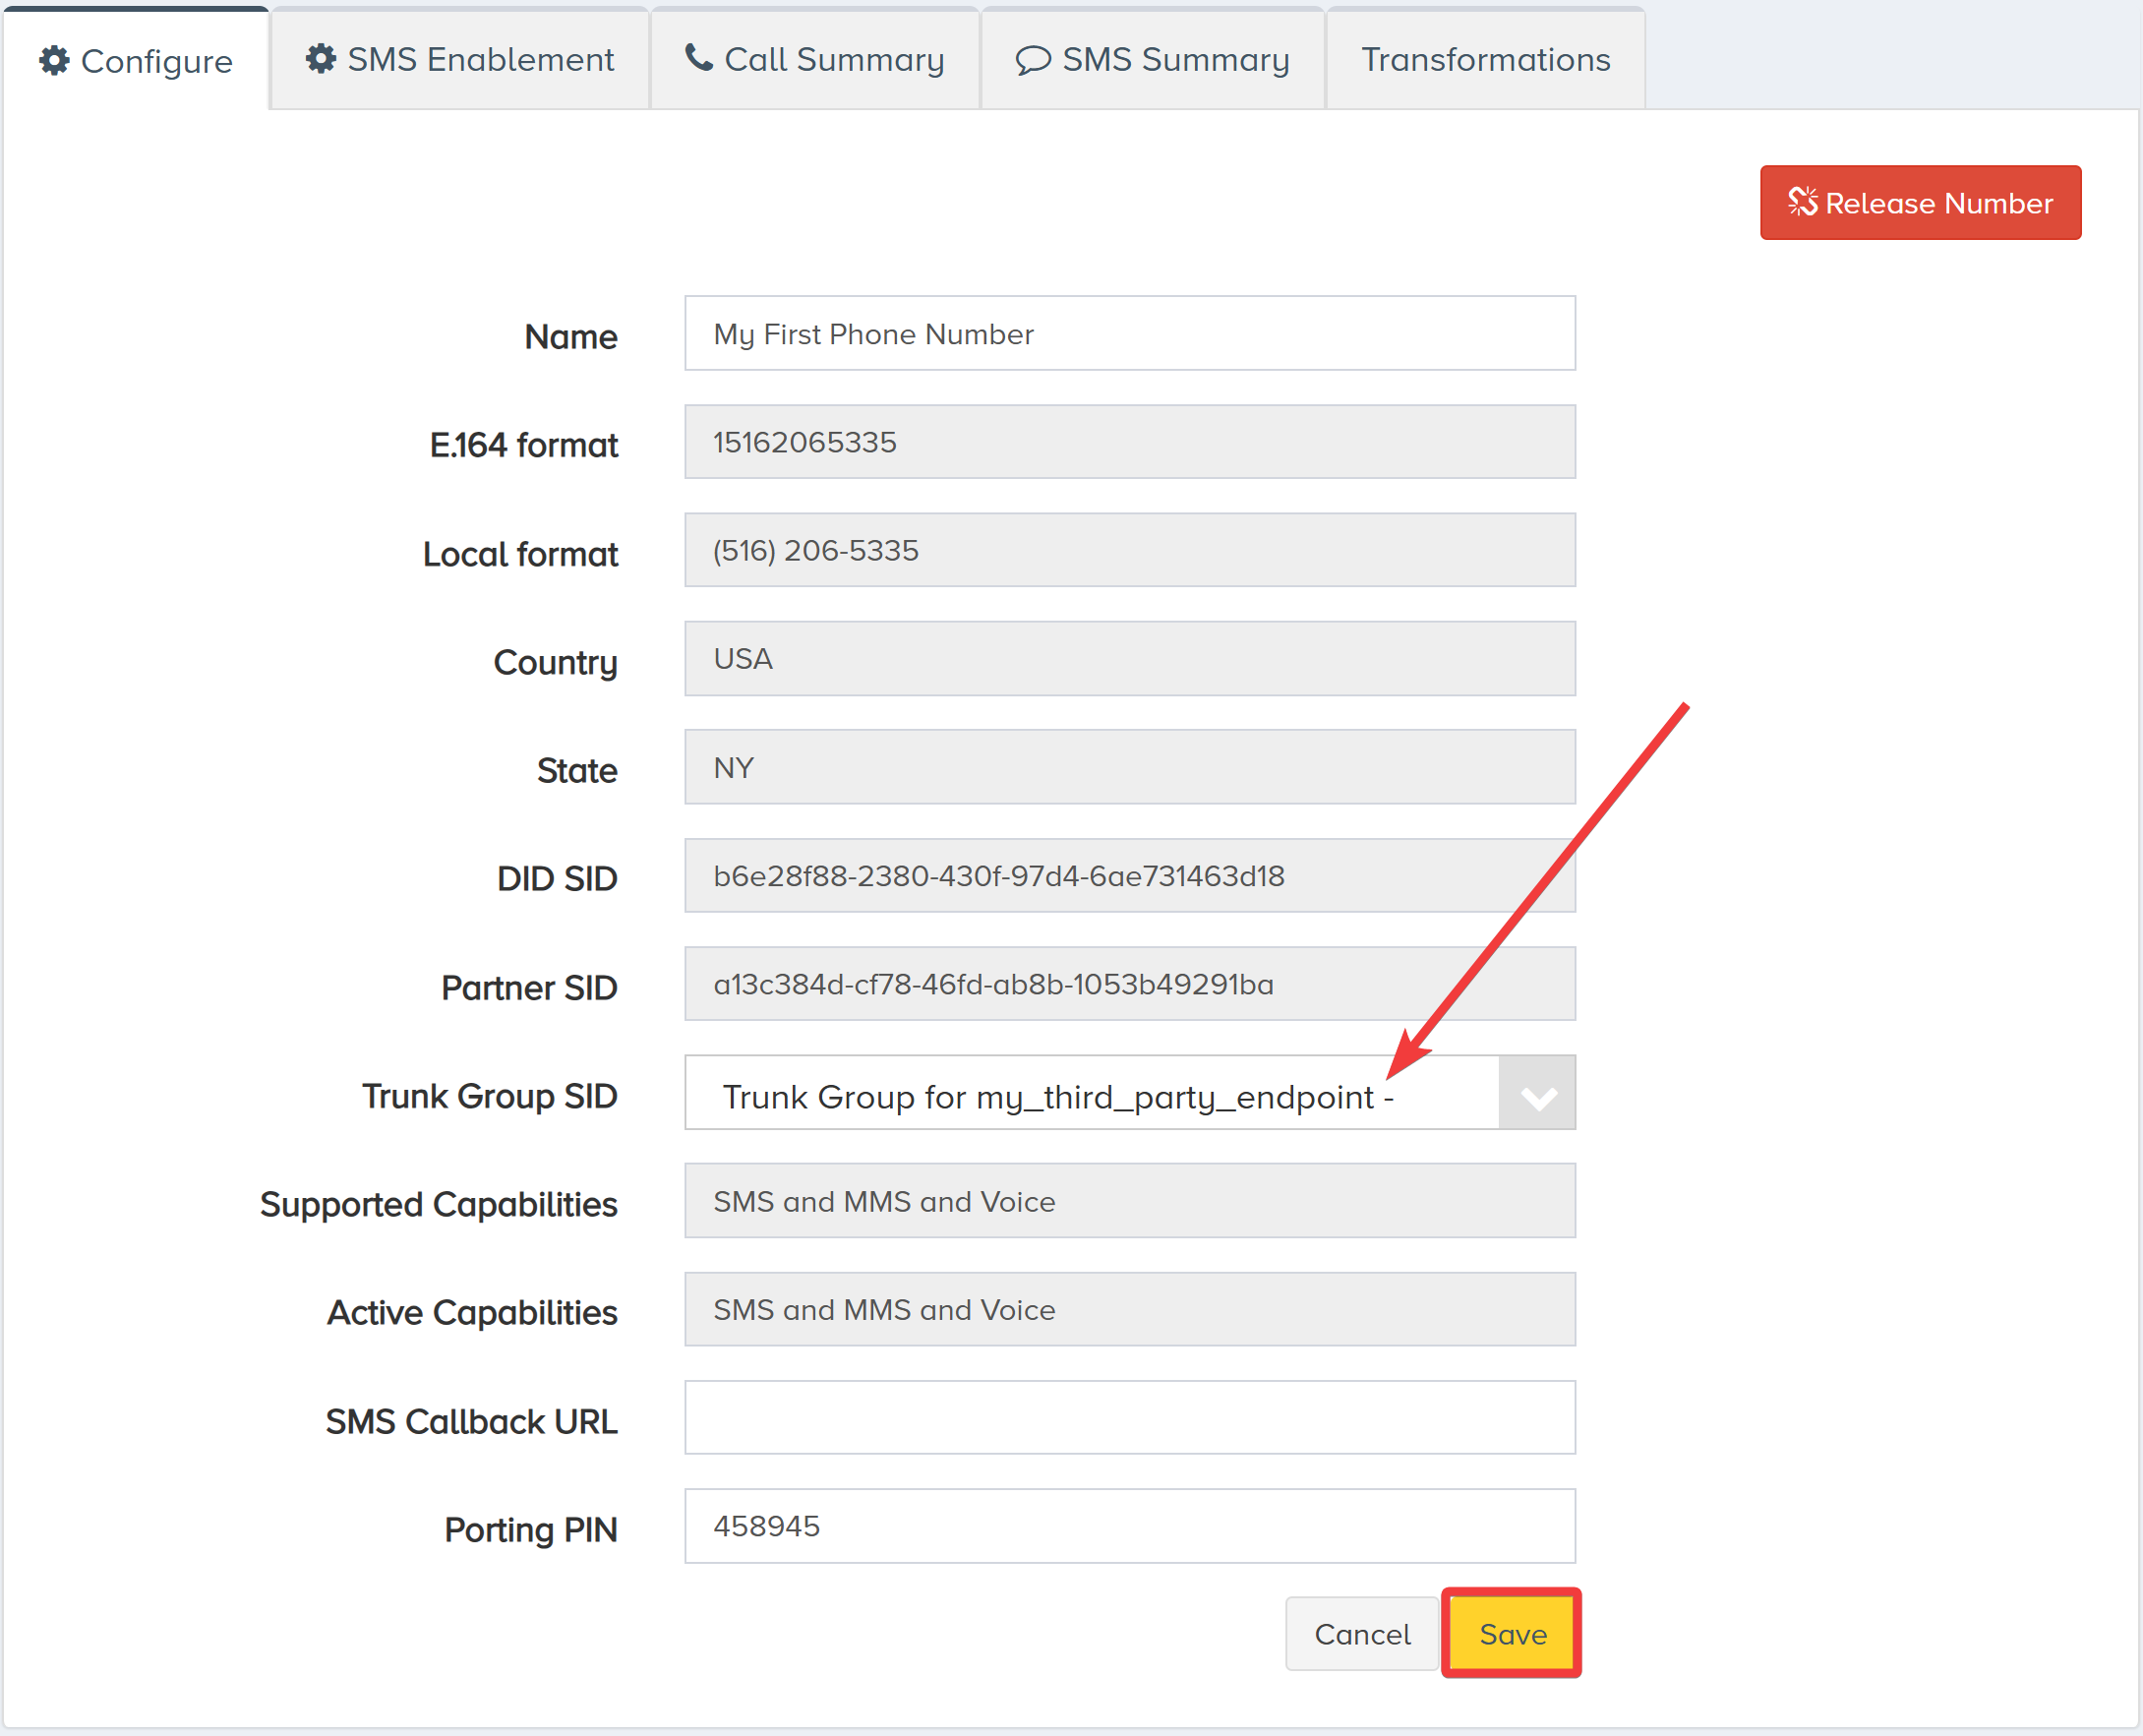
Now your SIP trunk is configured and a phone number is associated with it.
Create Using REST API
In this section, we will configure a SIP trunk programmatically using the CarrierX Core API.
Step 1: Create an Endpoint
Form a POST request with the type field and third_party value passed in the request body. You must also include an addresses array with at least one object containing the ip field. Optional fields such as port and transport will default if not provided.
All API requests must include:
Authorization: Bearer <API_TOKEN>Content-Type: application/json
curl -X POST \
'https://api.carrierx.com/core/v2/endpoints' \
-H 'Content-Type:application/json' \
--data-binary '{"addresses": [{"ip": "124.93.122.43"}], "type": "third_party"}' \
-H 'Authorization: Bearer 5ebc03d6-8b2b-44ad-bf65-72d4f1491dda'
A successful request will return a 200 status code along with a response that looks like the following:
{
    "addresses": [
        {
            "direction": "any",
            "dst_port": 5060,
            "ip": "124.93.122.43",
            "location_sid": null,
            "port": 5060,
            "priority": 0,
            "sip_password": null,
            "sip_username": null,
            "srtp": false,
            "subnet_mask": 32,
            "transport": "udp"
        }
    ],
    "attributes": {},
    "capacity": 0,
    "cps_limit": 0,
    "endpoint_sid": "5cfcc072-4ef2-4fa5-a896-4e44ea82befe",
    "name": "N/A",
    "out_sip_password": null,
    "out_sip_username": null,
    "partner_sid": "77354609-bd20-4ed0-a523-8c00792f15b8",
    "properties": {},
    "transformations": [],
    "type": "third_party",
    "voip_token": "7630d609-b0ae-41cf-bcc2-b326b5836370"
}
Step 2: Create a Trunk Group with Trunk
Form another POST request. This request will create a trunk group and assign it to the endpoint we just created. To create a trunk alongside the trunk group, pass the with_trunks field in the query URL with the true value. In the request body, pass the field name with a name for your new trunk group. Also pass a trunks array with the name and endpoint_sid fields.
curl -X POST \
  'https://api.carrierx.com/core/v2/trunk_groups?with_trunks=true' \
  -H 'Authorization: Bearer 5ebc03d6-8b2b-44ad-bf65-72d4f1491dda' \
  -H 'Content-Type: application/json' \
  --data-binary '{
    "name": "New Trunk Group",
    "trunks": [
      {
        "name": "Trunk1",
        "endpoint_sid": "6a898445-62c1-46cf-be8b-25c2a3c87ec7"
      }
    ]
  }'
The with_trunks=true query parameter ensures that at least one trunk is created together with the trunk group in a single request.
A successful request will return a 200 status code along with a response that looks like the following:
{
    "acls": [],
    "external_handlers": [],
    "hard_failure_codes": "408;",
    "hard_failure_cooldown": 120,
    "hard_failure_interval": 60,
    "hard_failure_last_resort": "first",
    "hard_failure_threshold": 3,
    "name": "New Trunk Group",
    "partner_id": null,
    "partner_sid": "77354609-bd20-4ed0-a523-8c00792f15b8",
    "routing_data": null,
    "routing_type": "failover",
    "sip_options_locations": [],
    "sip_options_threshold": 3,
    "soft_failure_codes": "408;",
    "transformations": [],
    "trunk_group_sid": "df9bd225-8966-4f04-a2e3-1a317683afd5",
    "trunks": [
        {
            "acls": [],
            "allow_forward": "disabled",
            "allow_transcoding": true,
            "allow_transfer": "disabled",
            "asn_mode": "disable",
            "call_type": "regular",
            "codec": null,
            "endpoint_sid": "6a898445-62c1-46cf-be8b-25c2a3c87ec7",
            "id": 2573954,
            "in_capacity": 0,
            "in_codec": null,
            "in_codec_list": "passthrough",
            "in_codec_priority": "leg_a_avoid_transcoding",
            "in_codec_wideband": null,
            "in_codec_wideband_list": "full_if_wideband",
            "in_identity_format": "passthrough",
            "in_identity_mode": "passthrough",
            "in_ip_profile_sid": null,
            "in_rfc_4694_mode": "cut_all",
            "location_sid": null,
            "name": "Trunk1",
            "out_capacity": 0,
            "out_codec": null,
            "out_identity_mode": "passthrough",
            "out_ip_profile_sid": null,
            "out_rfc_4694_mode": "cut_all",
            "out_sip_ringing_max_ttl": 180,
            "outbound_proxy": null,
            "priority": 0,
            "relay_sip_headers": [],
            "ring_control": "passthrough",
            "rtp_timeout": 0,
            "transformations": [],
            "trunk_sid": "af63f311-bad8-40bb-919d-eecb95affc1c",
            "weight": 0
        }
     ]
}
Call routing follows this path:
Phone Number → Trunk Group → Trunk → Endpoint
This means a phone number must be assigned to a trunk group before calls can reach the endpoint.
Now that we have programmatically created an endpoint and trunk group, we need to assign a phone number to the trunk group. Refer to the Phone Numbers section of the Core API Reference for information on renting and searching for DIDs.
Step 3: Select a Phone Number
Prior to renting a phone number, we need to find one that is available. For this, we will form a GET request and browse available DIDs.
curl -X GET \
'https://api.carrierx.com/core/v2/phonenumber/available_dids?limit=1&filter=capabilities+eq+31' \
-H 'Authorization: Bearer 5ebc03d6-8b2b-44ad-bf65-72d4f1491dda'
A successful request will return a 200 status code along with a response that looks like the following:
{
    "count": 1,
    "has_more": true,
    "items": [
        {
            "active_capabilities": 4,
            "attributes": {},
            "callback_url": null,
            "campaign_sid": null,
            "capabilities": 31,
            "classification_sid": "17f4d954-d635-4cda-912b-c2a2fa3a6860",
            "country_code": "USA",
            "did_group_sid": null,
            "did_sid": "b6e28f88-2380-430f-97d4-6ae731463d18",
            "in_country_format": "(516) 206-5335",
            "international_format": "+1 516-206-5335",
            "lata": null,
            "locality": null,
            "lrn_sid": null,
            "name": "My First Phone Number",
            "ocn": "252F",
            "ocn_block": null,
            "partner_sid": null,
            "pending_port_in": null,
            "phonenumber": "15162065335",
            "porting_pin": null,
            "price": "0.66",
            "state": "NY",
            "status": "available",
            "string_key_1": null,
            "string_key_2": null,
            "transformations": [],
            "trunk_group_sid": null,
            "underlying_carrier_sid": "61ced070-8dad-4bb4-b5e6-f7d61f7aeb65"
        }
    ],
    "limit": 1,
    "offset": 0,
    "pagination": {
        "next": "https://api.carrierx.com/core/v2/phonenumber/available_dids?limit=1&offset=1"
    },
    "total": null
}
Copy the value of the phonenumber field. You will use it in the next POST request to rent and assign the number.
Step 4: Assign a Phone Number
Form a POST request. This request will assign a phone number that is available. The request will fail if the phone number is already rented. Pass the phonenumber and trunk_group_sid fields in the request body. The phonenumber value should be taken from the request above. The trunk_group_sid should correspond with the value of that field when we created the trunk group.
For a more comprehensive guide to renting a phone number, refer to the Rent a Phone Number quick start guide.
curl -X POST \
'https://api.carrierx.com/core/v2/phonenumber/dids' \
-H 'Content-Type: application/json' \
--data-binary '{"phonenumber":"15162065335", "trunk_group_sid":"df9bd225-8966-4f04-a2e3-1a317683afd5"}' \
-H 'Authorization: Bearer 5ebc03d6-8b2b-44ad-bf65-72d4f1491dda'
A successful request will return a 200 status code along with a response that looks like the following:
{
    "active_capabilities": 4,
    "attributes": {},
    "callback_url": null,
    "campaign_sid": null,
    "capabilities": 31,
    "classification_sid": "17f4d954-d635-4cda-912b-c2a2fa3a6860",
    "country_code": "USA",
    "did_group_sid": null,
    "did_sid": "b6e28f88-2380-430f-97d4-6ae731463d18",
    "in_country_format": "(516) 206-5335",
    "international_format": "+1 516-206-5335",
    "lata": null,
    "locality": null,
    "lrn_sid": null,
    "name": "(516) 206-5335",
    "ocn": "252F",
    "ocn_block": "252F",
    "partner_sid": "77354609-bd20-4ed0-a523-8c00792f15b8",
    "pending_port_in": null,
    "phonenumber": "15162065335",
    "porting_pin": "626948",
    "price": "0.66",
    "state": "NY",
    "status": "assigned",
    "string_key_1": null,
    "string_key_2": null,
    "transformations": [],
    "trunk_group_sid": "df9bd225-8966-4f04-a2e3-1a317683afd5",
    "underlying_carrier_sid": "61ced070-8dad-4bb4-b5e6-f7d61f7aeb65"
}
Result
Your SIP trunk is now fully configured:
- Endpoint created
- Trunk group and trunk configured
- Phone number assigned
Next Steps
You have configured a SIP trunk! Now you can test incoming and outgoing calls on your new endpoint.
Refer to our Core API Reference for more in-depth documentation about Endpoints and Trunk Groups.