Configure Mediator Endpoint
In this guide, you will learn how to configure a Mediator endpoint. The Mediator endpoint is used to create intermediaries, called bindings and dialouts, between phone numbers. Bindings route incoming calls to a destination phone number. Dialouts make outgoing calls to two different parties, who are then brought into a call together.
Refer to our How It Works: Endpoints section to learn more about what endpoints are, what endpoints are available in CarrierX API, what they are used for, and how you can work with them.
The Mediator Endpoint section also explains the concept of bindings and dialouts.
Create Endpoint
Before creating a Mediator endpoint, you need to have:
- A CarrierX account. If you don't have one, sign up.
- A rented phone number. If you don't have one, rent a phone number.
In this section, we will go over setting up a Mediator endpoint through the portal. We will also associate a phone number with the endpoint.
To set up a Mediator endpoint, log into your CarrierX account.
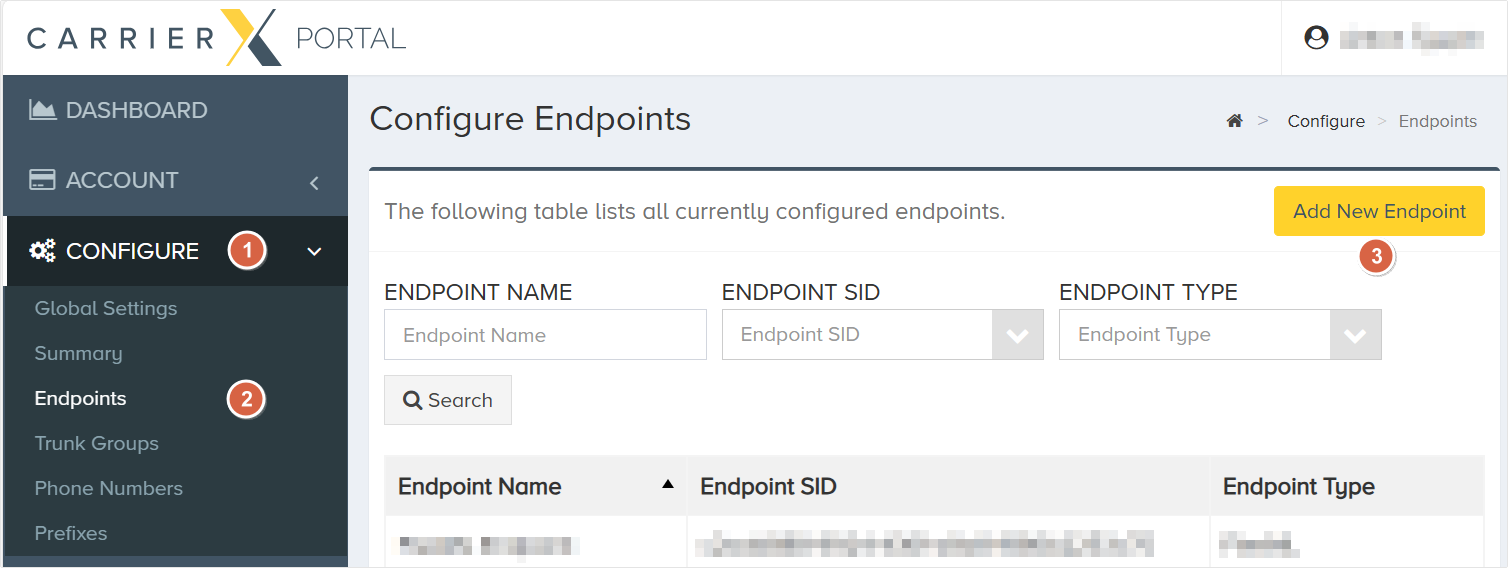
In the left-hand navigation menu, select CONFIGURE > Endpoints. Then, in the top-right corner, click the Add New Endpoint button.
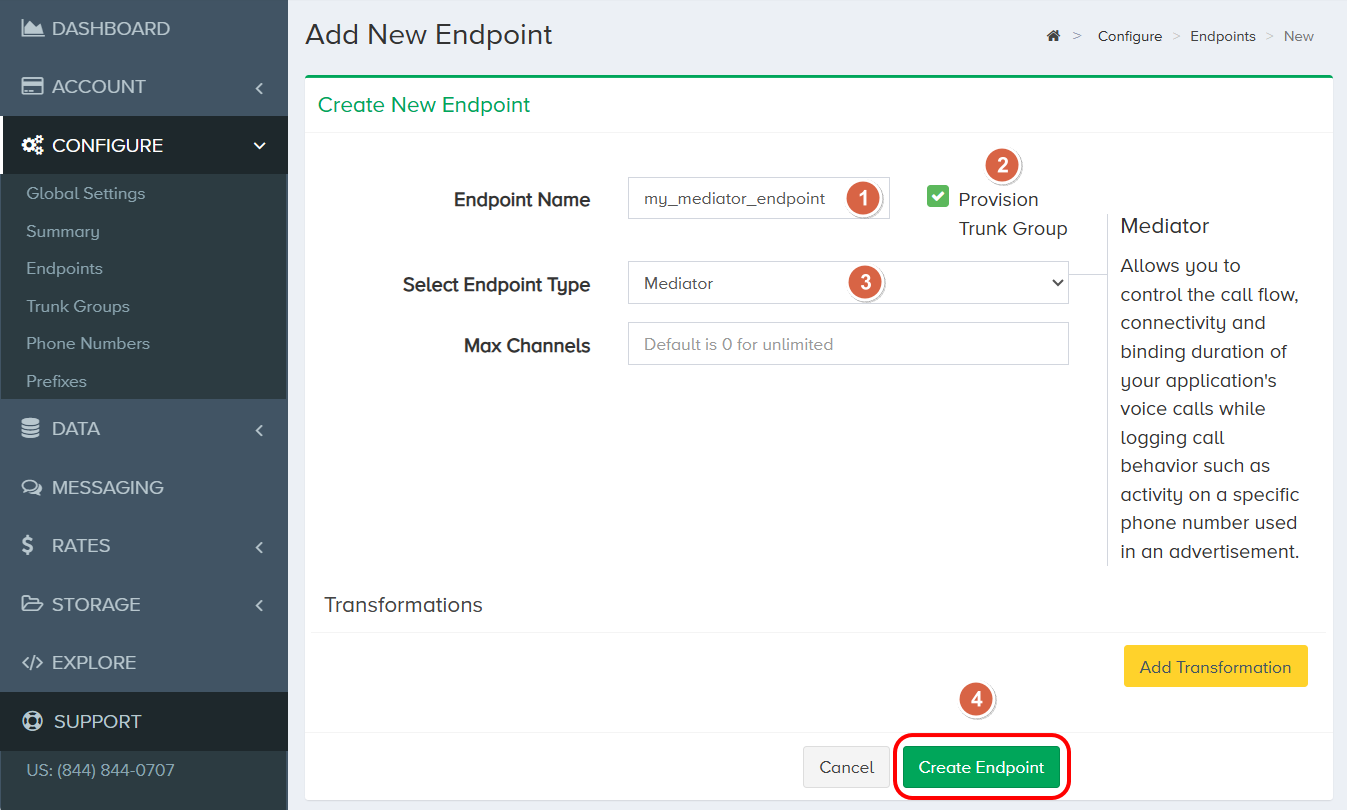
Enter a name for the new endpoint. This is a friendly name that is used for internal reference.
Check Provision Trunk Group to create a trunk group alongside the endpoint. A trunk group determines where a call should be routed. Trunks route calls to the appropriate endpoint by identifying the DID, or phone number, dialed and matching it to the trunk group that the DID is assigned to.
This guide includes instructions on assigning a DID to a trunk group. For more information about trunk groups and how to manage them programmatically, please refer to the Core API Reference.
Choose Mediator from the Select Endpoint Type dropdown menu. Click the Create Endpoint button.
Assign Phone Number
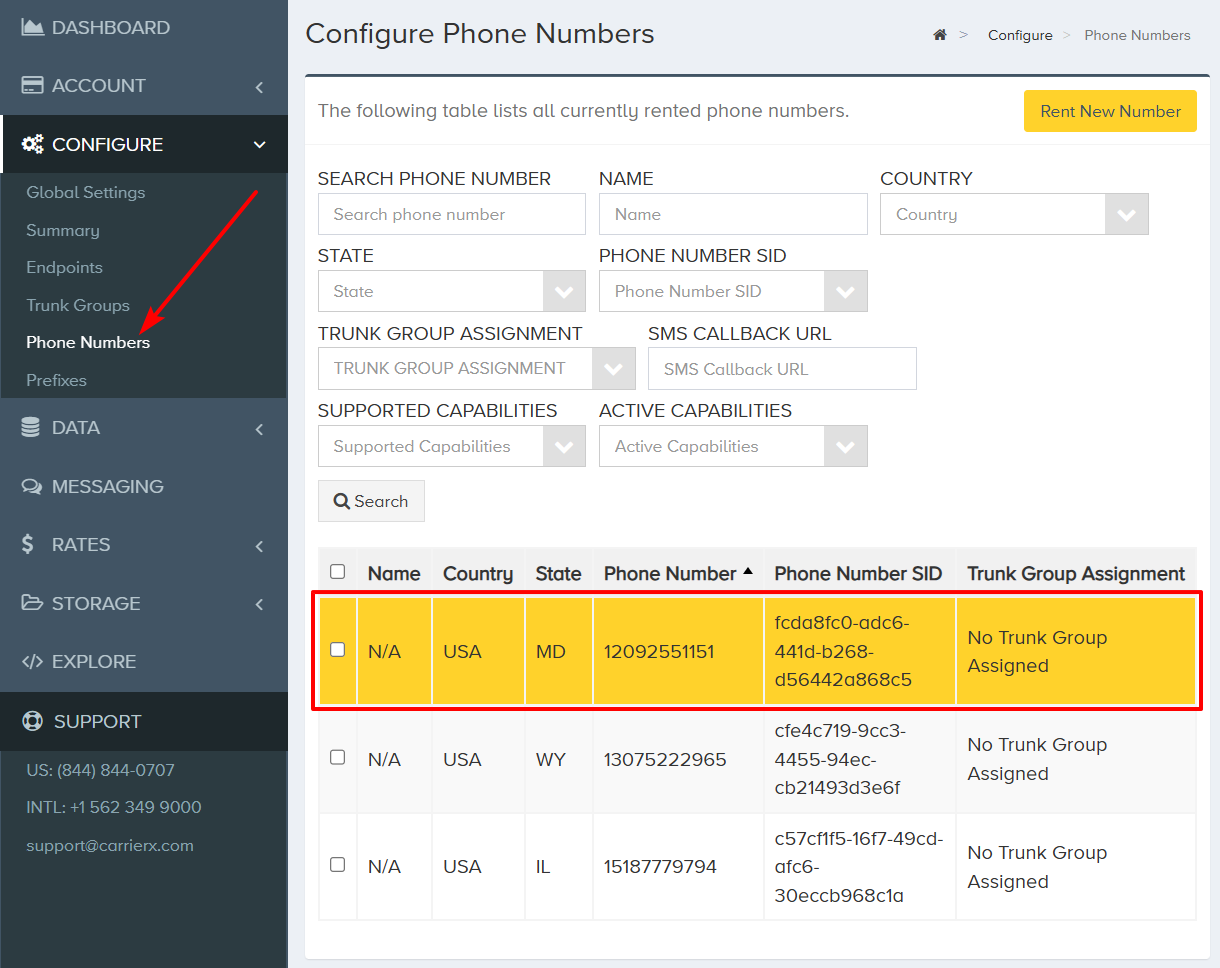
The Mediator endpoint needs to be associated with one or more DIDs rented through CarrierX. These DIDs will be used as the redirect_did values to properly route calls. Navigate back to the CONFIGURE menu and click Phone Numbers.
Click a phone number that you would like to associate with the endpoint trunk group. In this example, we are selecting a phone number with no trunk group assigned to it already. You can select a phone number with an assigned trunk group and reassign it.
Once an available phone number is selected, scroll down and click the Edit button.
Select the trunk group of the newly-created endpoint from the dropdown list.
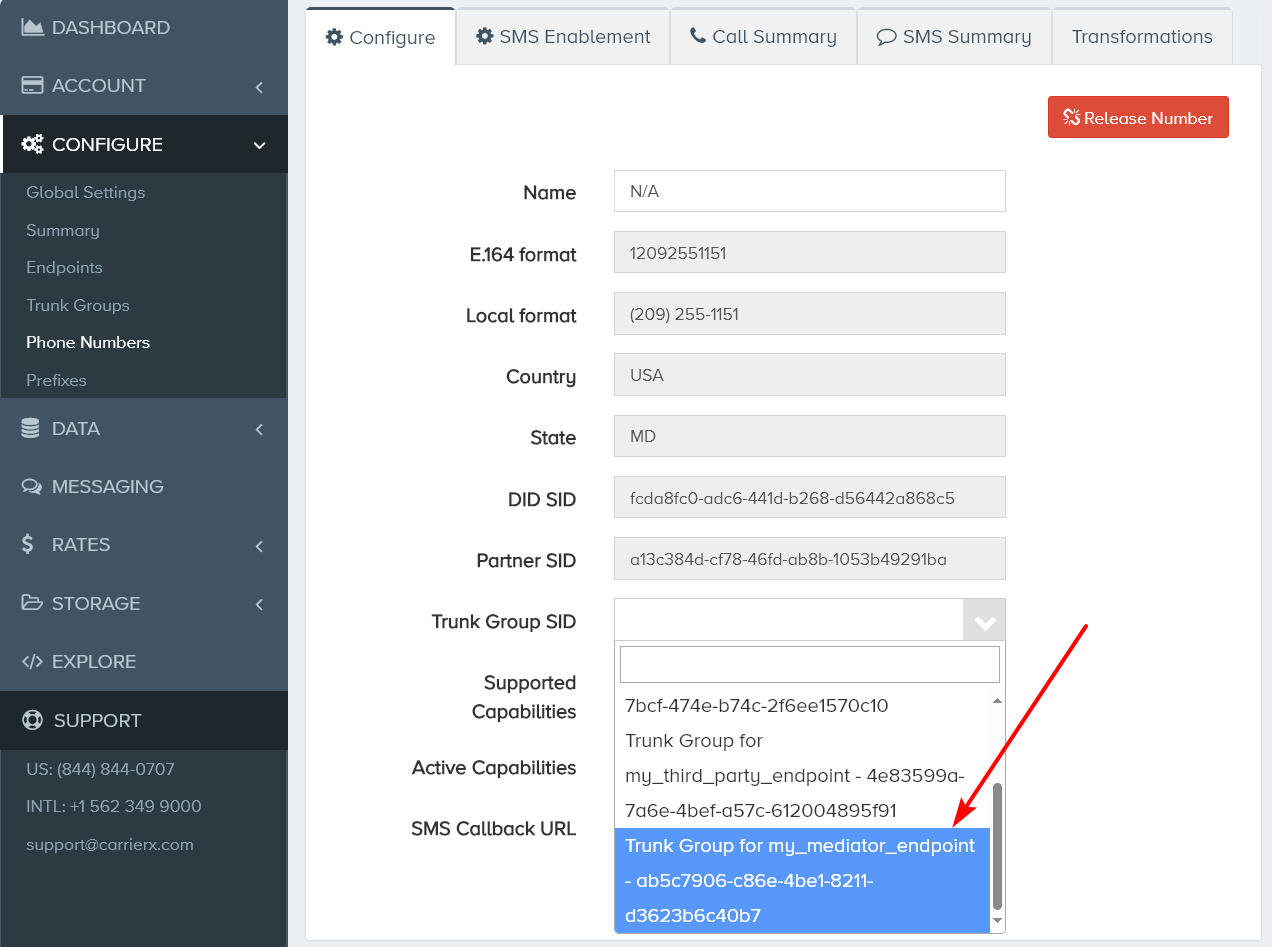
Click the Save button.
Now that we have configured a Mediator endpoint and associated a phone number, we can move on to further actions with this endpoint.
Create Bindings
A binding creates forwarding logic. Bindings enable call forwarding from one phone number to another.
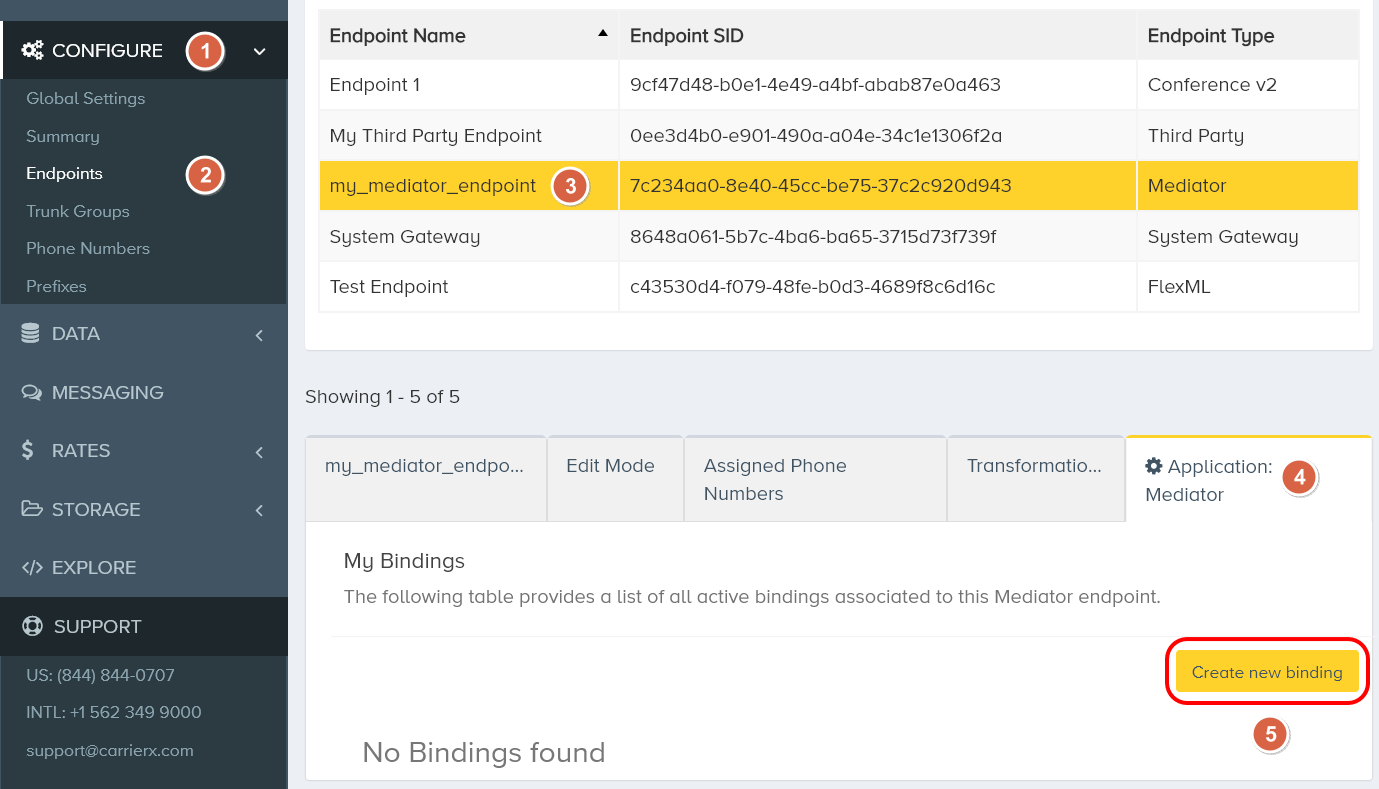
Navigate back to the CONFIGURE menu and click Endpoints.
Select the Mediator endpoint you have created earlier. Open the Application: Mediator tab and click the Create new binding button.
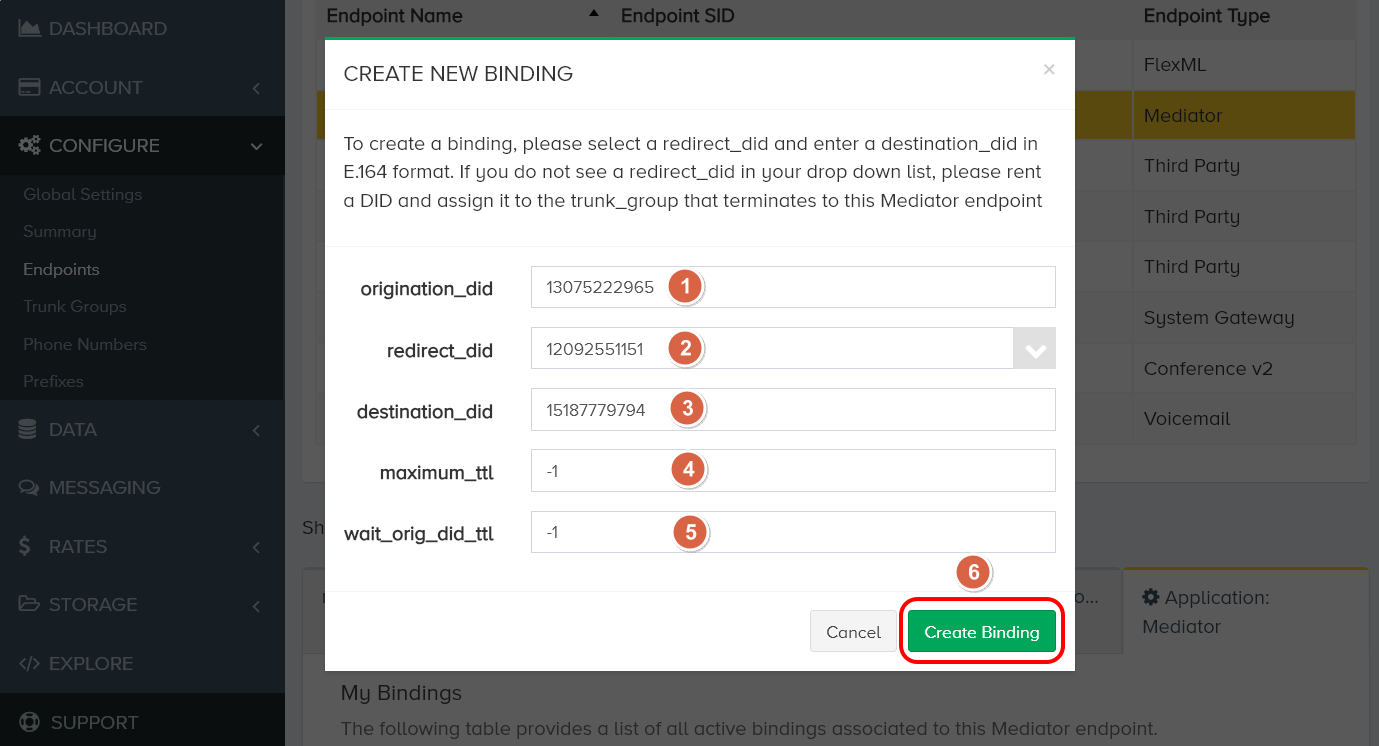
To create a binding, fill in the fields in the Create New Binding dialog window. All DIDs must be entered in E.164 format.
-
Enter an
origination_didif you want the binding to be applicable only to calls from that phone number. Leave the field blank if you want this binding to apply to calls from any incoming phone numbers. -
From the drop-down list, select a
redirect_did. This is the phone number that will be dialed by callers, and all such calls will be forwarded to thedestination_did.infoIf you do not see a
redirect_didin your drop down list, you need to rent a DID first and assign it to thetrunk_groupthat terminates to this Mediator endpoint. -
Enter a
destination_did. This is the phone number that will receive the calls forwarded from theredirect_did.notedestination_didis the only field required to create a binding. This is the phone number that will receive calls. Refer to the Create Binding section in the Mediator API Reference for more information. -
Enter the
maximum_ttl(time-to-live), which is the length of time the binding will remain active. To create an indefinite binding, enter-1. -
In the
wait_origination_did_ttlfield, leave the-1value to disable this feature. We do not need it in this Quick Start.noteBy default, bindings are time limited, and their longevity depends on the values of
wait_origination_did_ttlandmaximum_ttl. In this example, we set both values to-1, meaning that the binding will never expire. All phone calls made to theredirect_didwill be forwarded to thedestination_did. Theredirect_didis a DID rented from CarrierX that is assigned to the Mediator endpoint trunk group. -
Click the Create Binding button.
We have successfully created a binding. Now all calls coming from the origination_did to the redirect_did will be forwarded to the destination_did.

Perform Dialouts
The Mediator endpoint also provides the capacity to create a dialout, which makes calls to two phone numbers and brings them into a call together.
Dialouts cannot be created using the Portal. To create a dialout, you will need to use the Mediator API.
Credentials used to create both, bindings and dialouts through the API, can be found by navigating to Endpoints under the CONFIGURE menu item. Select the endpoint you would like to create a binding or a dialout for and scroll down to see the API Base URL, API Login, and API Password.

Note that there is a unique login and password for each endpoint.
The stage_one_destination_did and stage_two_destination_did fields are required to create a dialout.
The stage_one_destination_did is the first phone number that is dialed out to by the system. The redirect_did is what appears by default on the receiving party's caller ID.
If the recipient answers the phone call, the stage_two_destination_did is then dialed out to. If this second recipient also answers, both the stage_one_destination_did and stage_two_destination_did call recipients can then speak with one another.
curl -X POST \
'https://api.carrierx.com/mediator/v1/dialouts' \
-H 'Content-Type: application/json' \
--data-binary '{"stage_one_destination_did":"15162065339", "stage_two_destination_did":"15162065338"}' \
-u '[your_mediator_endpoint_username]:[your_mediator_endpoint_password]'
Note that unless a delay value is set, the system will dial the stage_one_destination_did as soon as a successful POST request has been made. In this example, the dialout will be executed immediately.
A successful response will return a 200 status code and a JSON object that looks like the following.
{
    "body": {
        "account_sid": "0a1ba365-71e0-45af-b49c-a7b08e6650c7",
        "attributes": {
            "hide_origination_did": "true"
        },
        "date_created": "2024-02-19T19:56:36.702Z",
        "delay": 0,
        "dialout_sid": "d9ae9fd7-37ff-4e96-910c-8dd2f4959617",
        "redirect_did": "12092551151",
        "stage_one_destination_did": "15162065339",
        "stage_two_destination_did": "15162065338"
    },
    "status": 200
}
We have successfully created a dialout. Now when a dialout API call is made, the redirect_did will first try to connect to stage_one_destination_did. If it answers the call, the redirect_did will dial the stage_two_destination_did. If this second recipient also answers, they can both speak to each other.

Look Up DIDs
The Mediator API can also be used to look up DIDs associated with the Mediator endpoint. Form a GET request to do so. Filtering and Pagination parameters can be added to this request to narrow the results. Refer to the Using the REST API section of the Mediator API Reference for more information.
curl -X GET \
'https://api.carrierx.com/mediator/v1/dids' \
-u '[your_mediator_endpoint_username]:[your_mediator_endpoint_password]'
A successful response will return a 200 status code and a JSON object that looks like the following.
{
    "body": {
        "count": 1,
        "has_more": false,
        "items": [
            {
                "account_sid": "0a1ba365-71e0-45af-b49c-a7b08e6650c7",
                "country_code": "USA",
                "did_sid": "9943812f-bac0-45b2-a1bb-01674b7183bf",
                "in_country_format": "(209) 255-1151",
                "international_format": "+1 209-255-1151",
                "phonenumber": "12092551151"
            }
        ],
        "limit": 10,
        "offset": 0,
        "pagination": {},
        "total": 1
    },
    "status": 200
}
Next Steps
You have configured a Mediator endpoint! For more information, refer to the Mediator API Reference.
If you would like to review the steps to configuring the Mediator endpoint, refer to the video tutorial.