Configure FlexML Endpoint
Introduction
FlexML endpoints enable you to create powerful call flows using simple XML instructions. This guide walks you through:
- Creating a FlexML endpoint
- Assigning phone numbers
- Building a sample voice app
- Handling inbound calls
- Making outbound calls
FlexML uses XML verbs like <Say> and <Record> that execute in sequence to control call flow.
1. Create Your FlexML Endpoint
Before creating an FlexML endpoint, you need to have:
- A CarrierX account. If you don't have one, sign up.
- A rented phone number. If you don't have one, rent a phone number.
Step-by-Step Setup
-
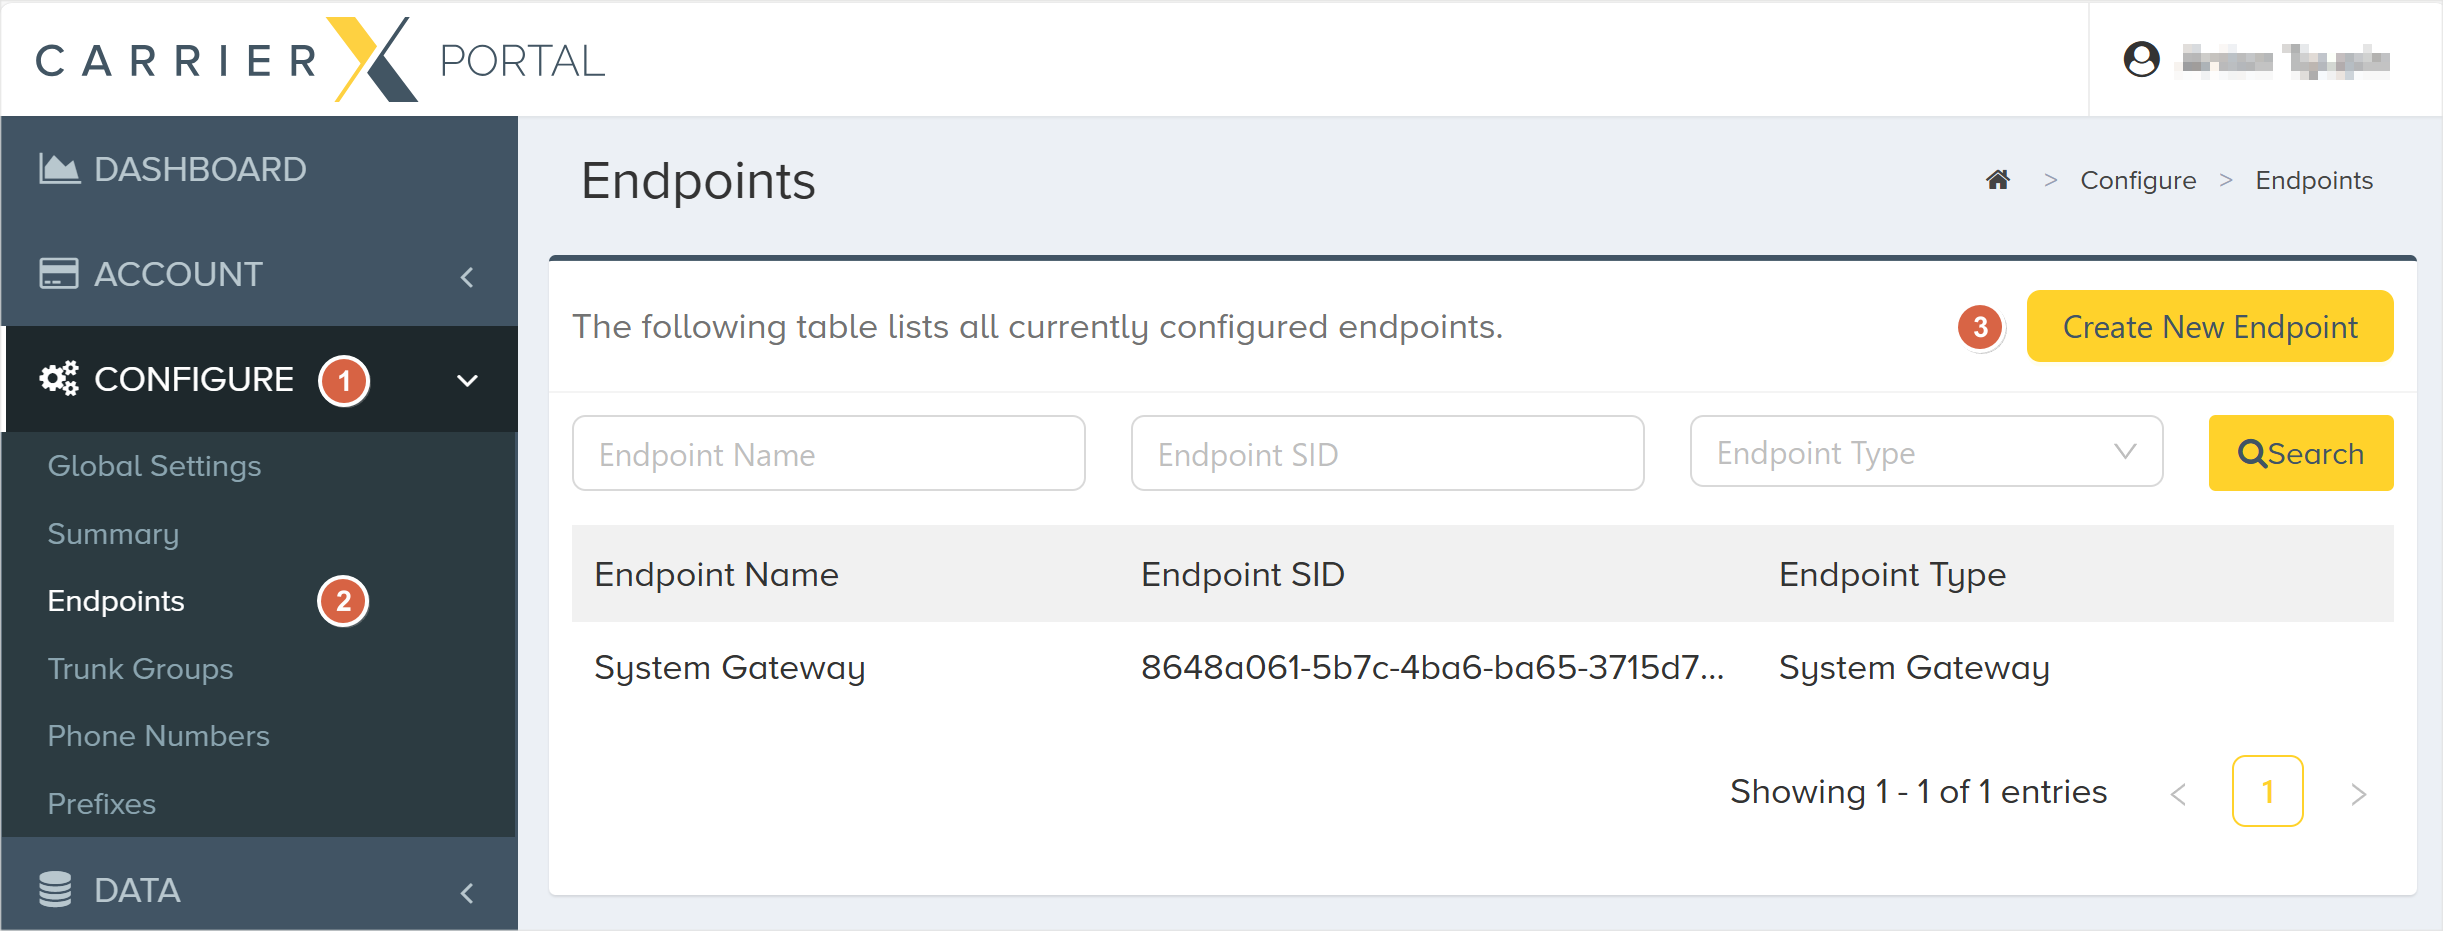
Once you've loged in to your CarrierX account, select CONFIGURE
-
Navigate to Endpoints
-
Click Create New Endpoint
Configuration Options
-
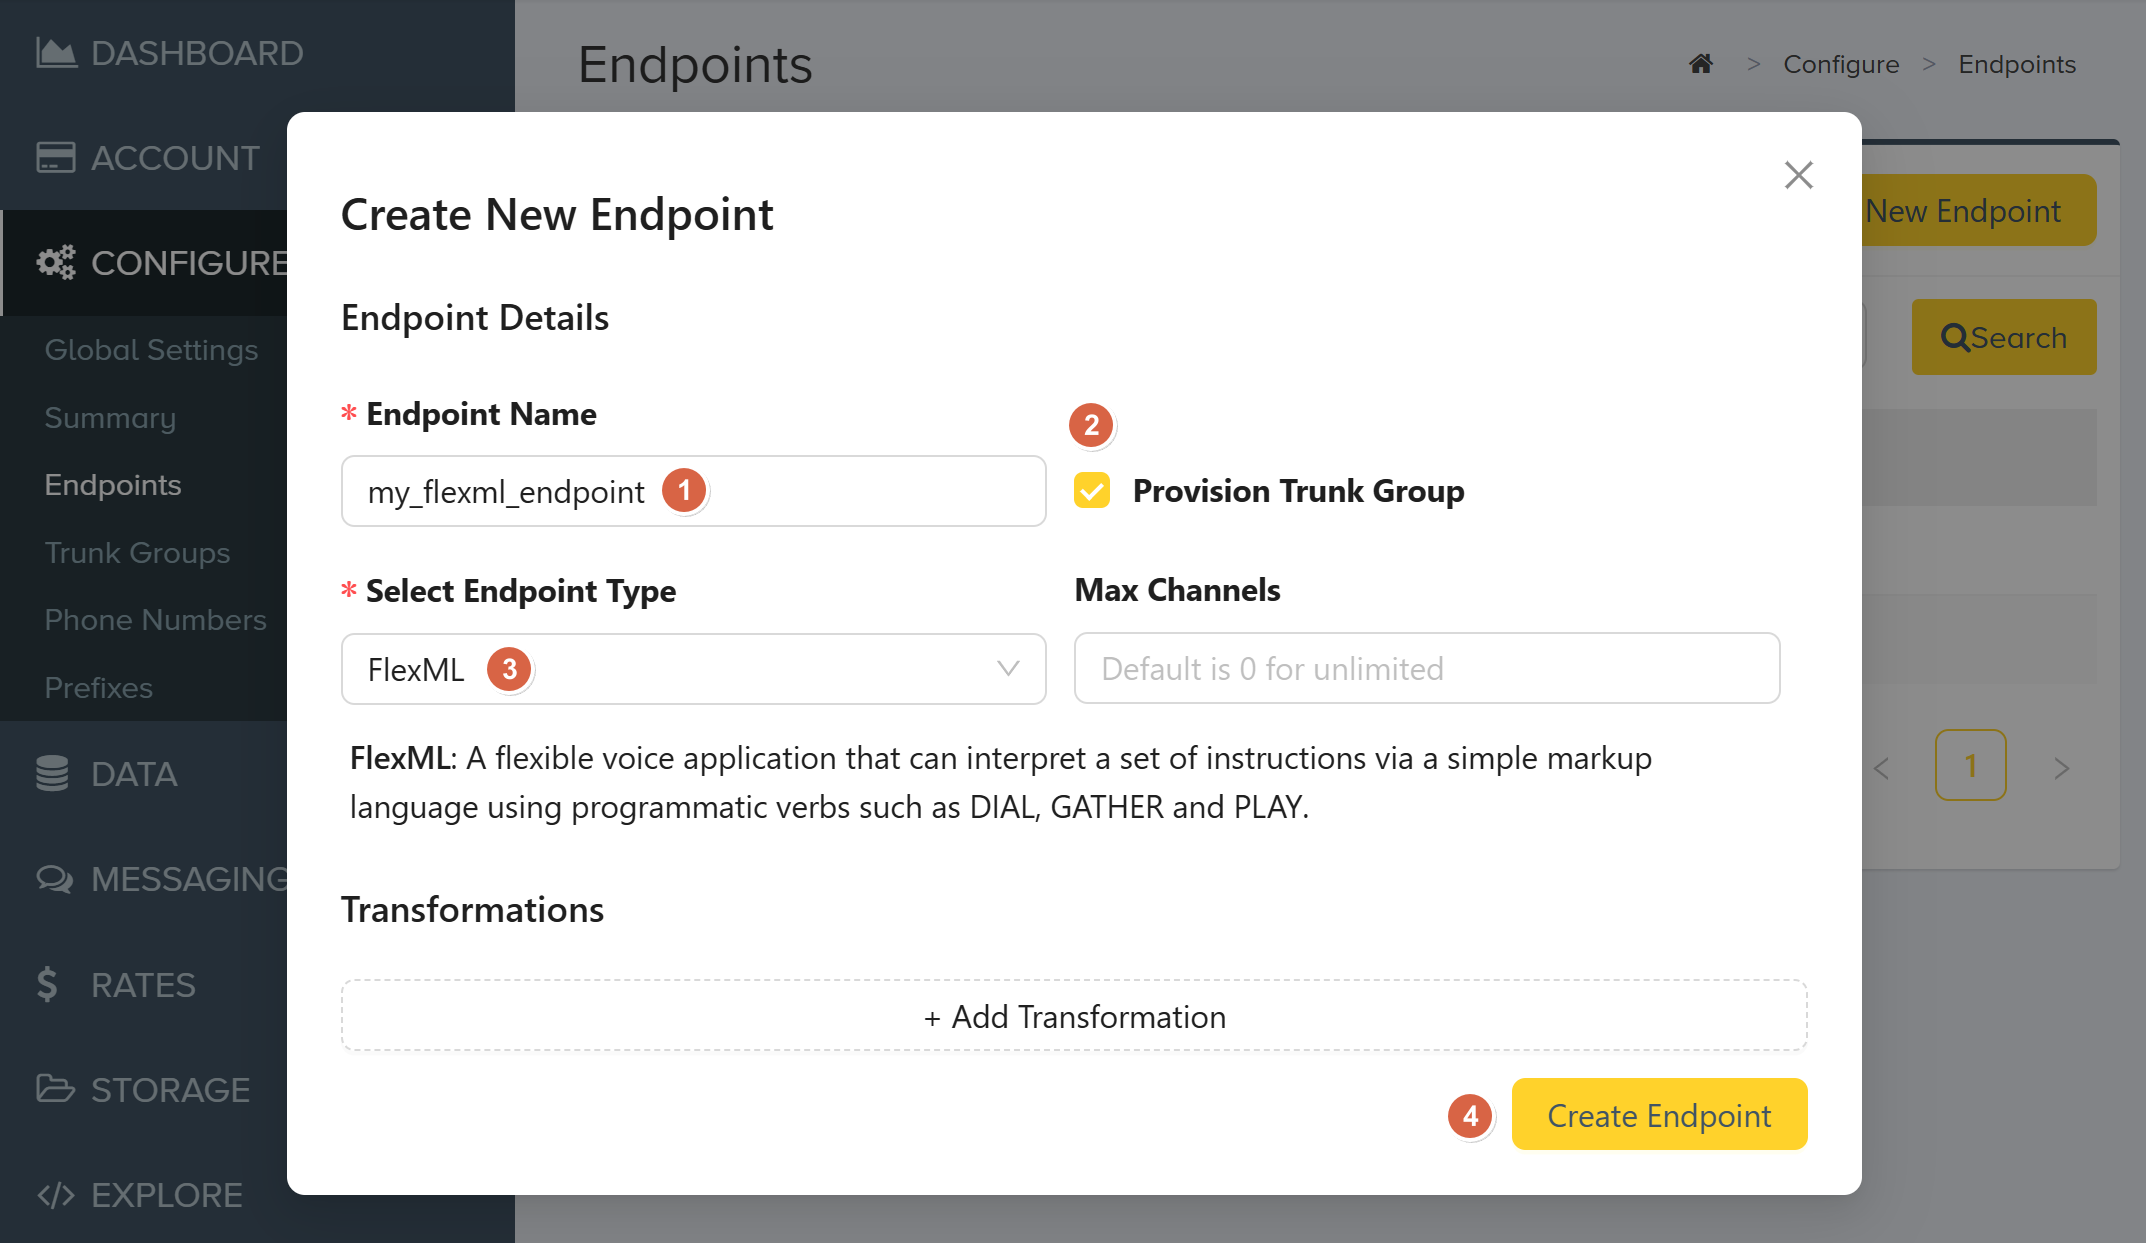
Type in the Endpoint Name: This is the internal reference name
-
Check Provision Trunk Group: Required for call routing
About Trunk GroupsTrunks route calls by matching dialed numbers to assigned DIDs. Learn more or see the Core API docs.
-
Select Endpoint Type: Select FlexML
-
Click Create Endpoint
2. Assign Phone Numbers
Linking Numbers to Your Endpoint
As soon as you create a FlexML endpoint, you will see your endpoint details:
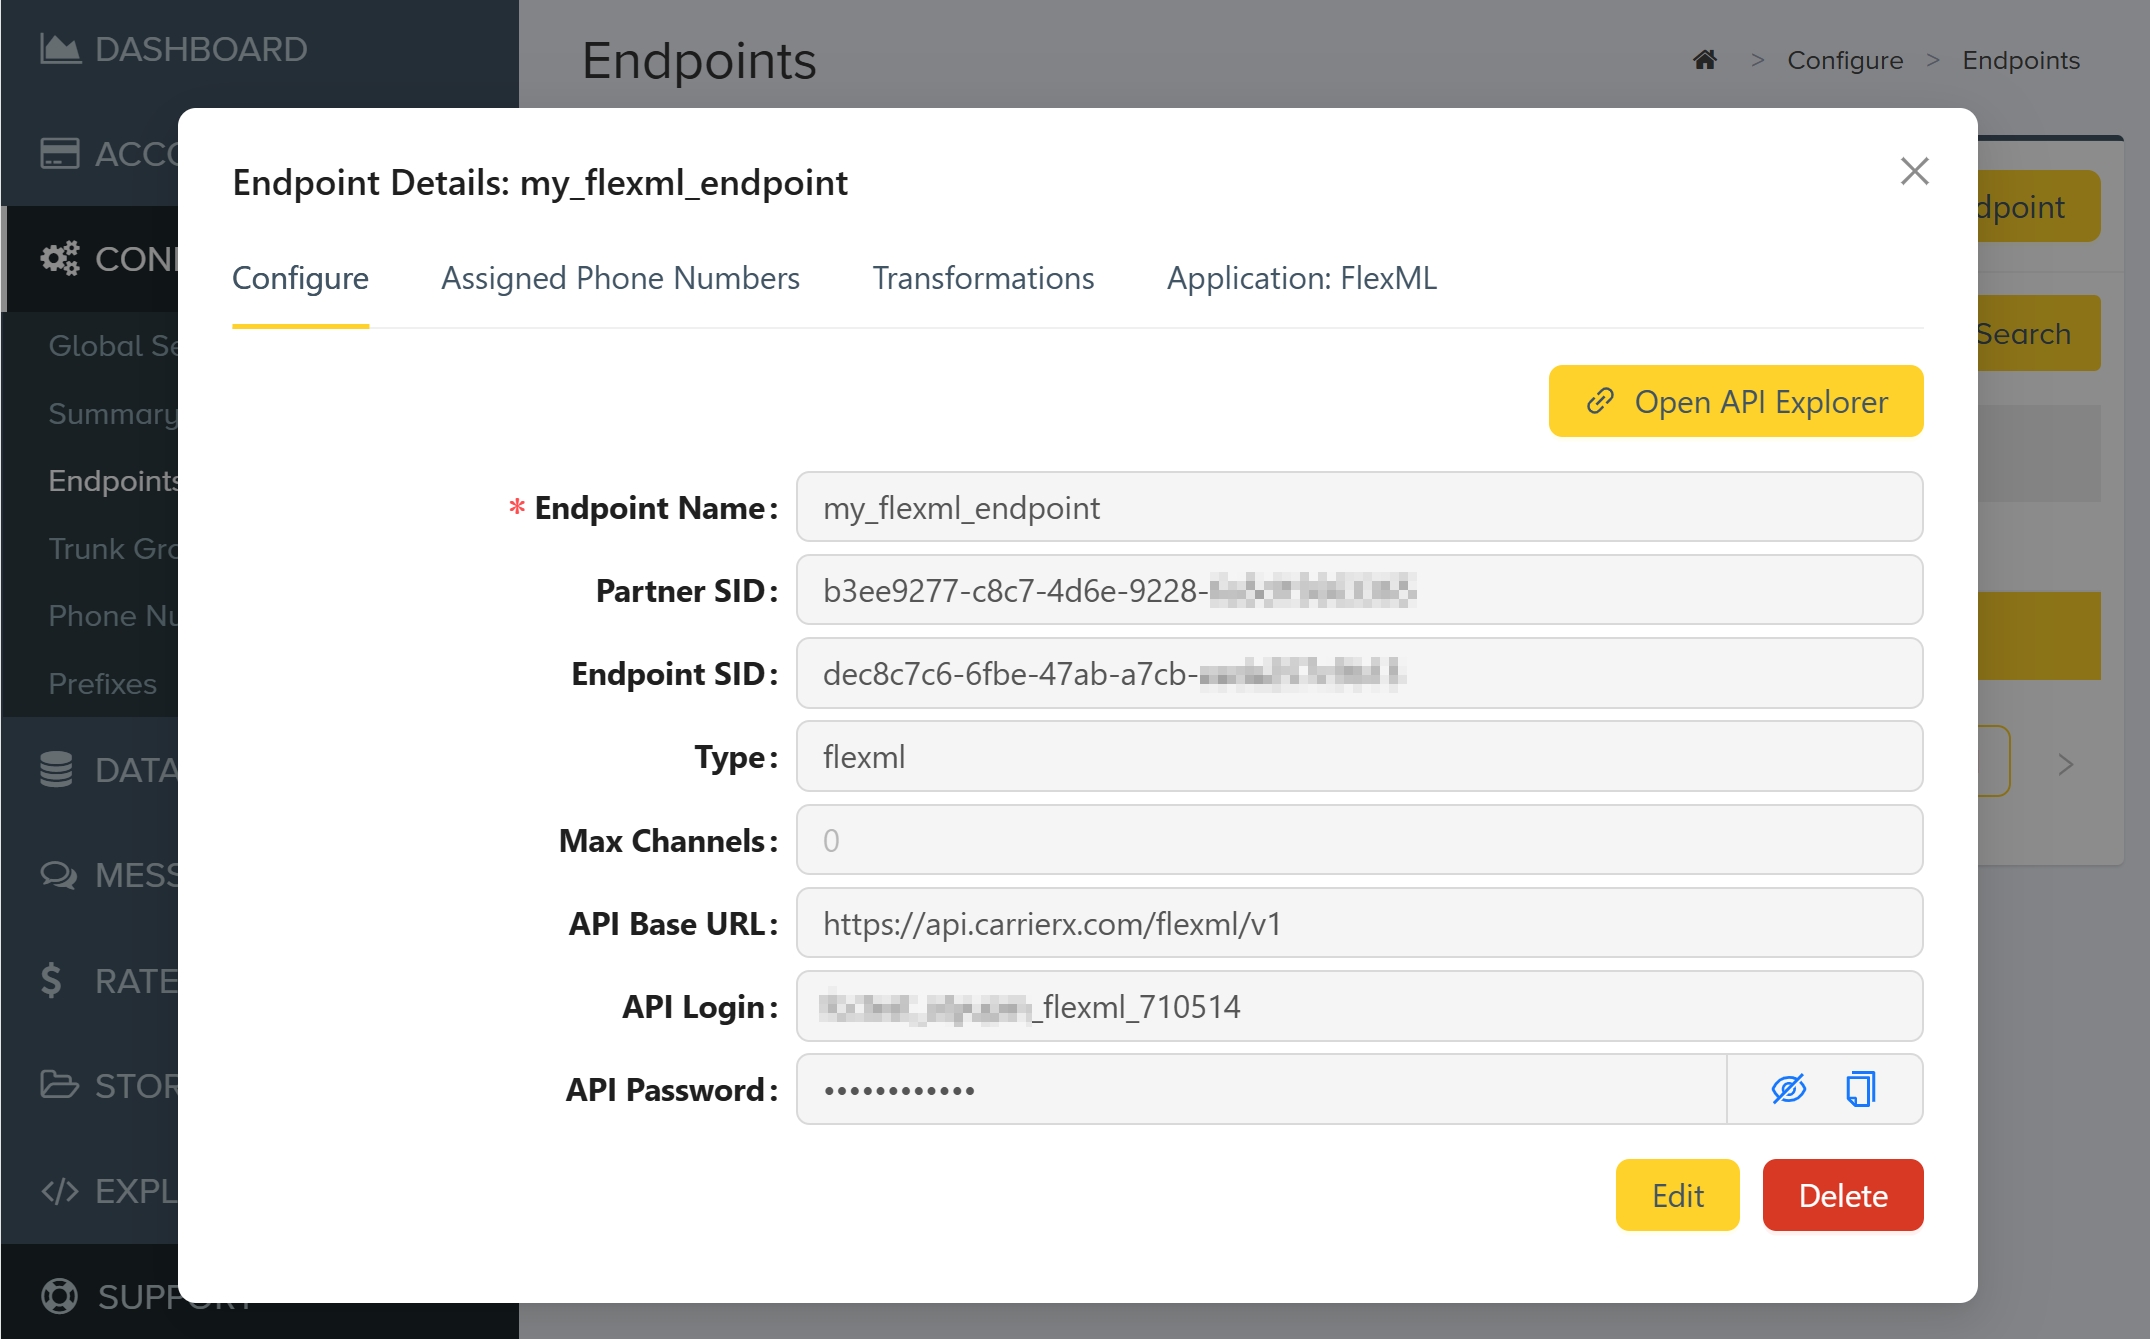
Now you can assign phone numbers to your endpoint. This allows you to receive inbound calls on the assigned numbers.
-
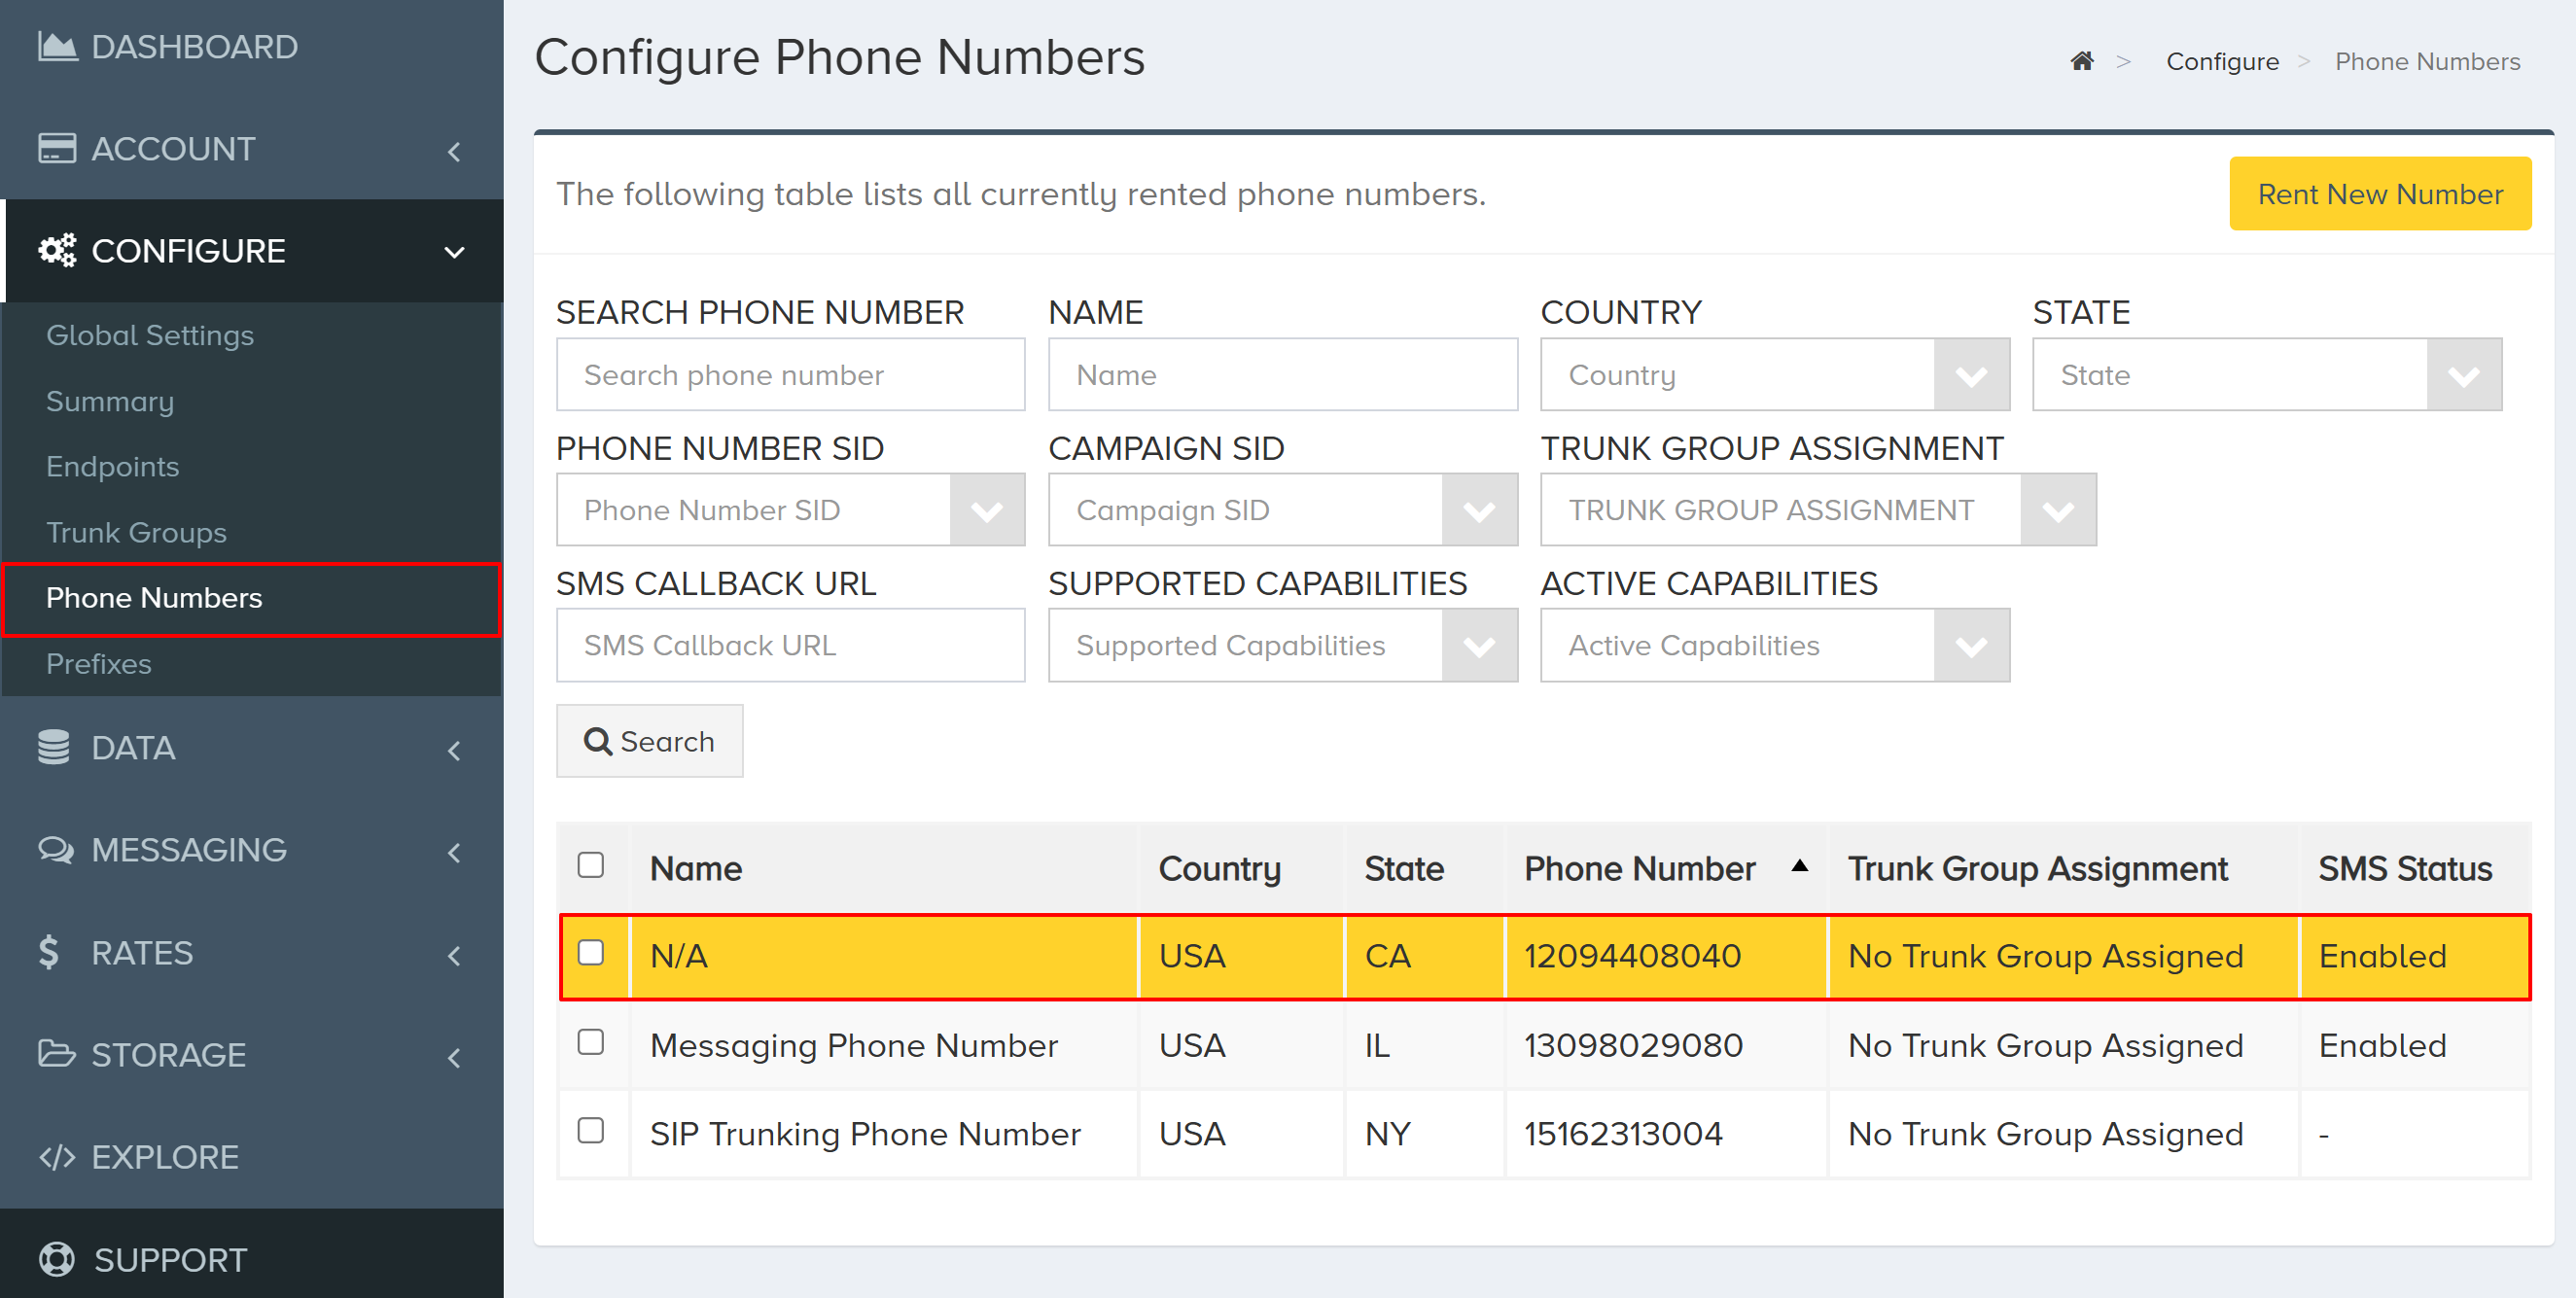
Go to CONFIGURE > Phone Numbers
-
Select an available number:
-
Scroll down to the bottom and click Edit
-
Choose your endpoint's trunk group from the Trunk Group SID dropdown. This is the trunk group we've provisioned earlier when creating our FlexML endpoint.
-
Click Save
You can assign multiple numbers to the same endpoint - callers can dial any assigned number to reach your endpoint.
3. Build a Voice Application
In this section, we will build a simple voice application with Python, Flask, and ngrok, which we will use for inbound and outbound calls. An application can be built using any language and tools you are familiar with.
Example Python/Flask App
Start with a hello.py file inside your project directory. Create the following POST route, which returns FlexML.
from flask import Flask
app = Flask(__name__)

@app.route('/hello', methods=['POST'])
def hello():
    return '''
    <Response>
        <Say>Hello, thank you for calling.</Say>
    </Response>
    '''
Running Your App
-
Install Flask:
Windows MacOS/Linux pip install flaskpip3 install flask -
Set the environment variable:
Windows MacOS/Linux set FLASK_APP=hello.pyexport FLASK_APP=hello.py -
Start the Flask server:
Windows MacOS/Linux python -m flask runpython3 -m flask runWhen Flask starts, it will display the following message in the terminal window:
* Running on http://127.0.0.1:5000The port number may vary depending on your configuration. The default port is
5000. -
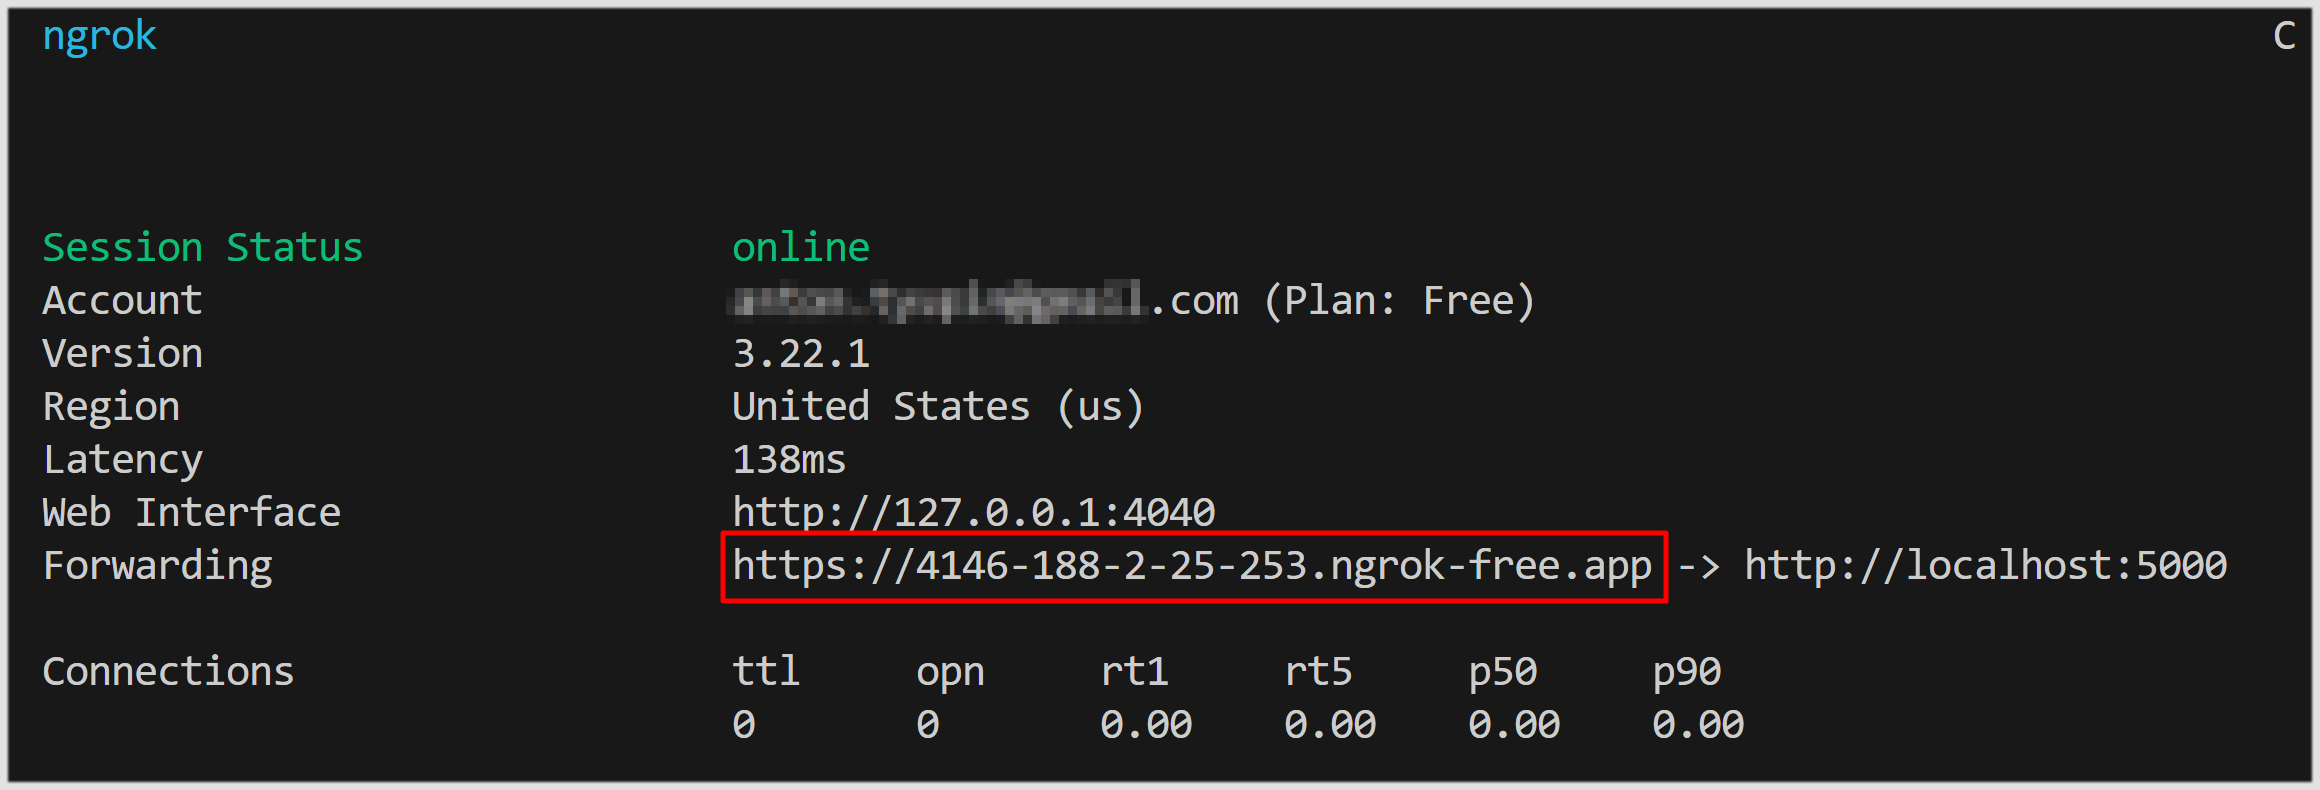
Use a free tool called ngrok to expose our localhost application to the Internet. The service needs to be reachable on the public Internet so that your endpoint can access and load the FlexML instructions.
Install ngrok and then run the command with the port number that your local server is running on. In this example, our server is running on port
5000.ngrok http 5000 -
When ngrok is run successfully, the following data will show in the terminal window. The URL in the red box is now accessible publicly on the Internet.
4. Configure Inbound Calls
Two Assignment Methods: handler URLs can be assigned to a DID or to a FlexML endpoint.
DID-assigned URLs take precedence over endpoint URLs if both are set.
Option A: Assign URL to a Phone Number
First, we will learn how to add the handler URL to the DID associated with the FlexML endpoint trunk group.
When inbound calls are made to the DID, a request to the URL will be triggered. In our example, when individuals call the DID, they will hear the message nested inside the Say verb.
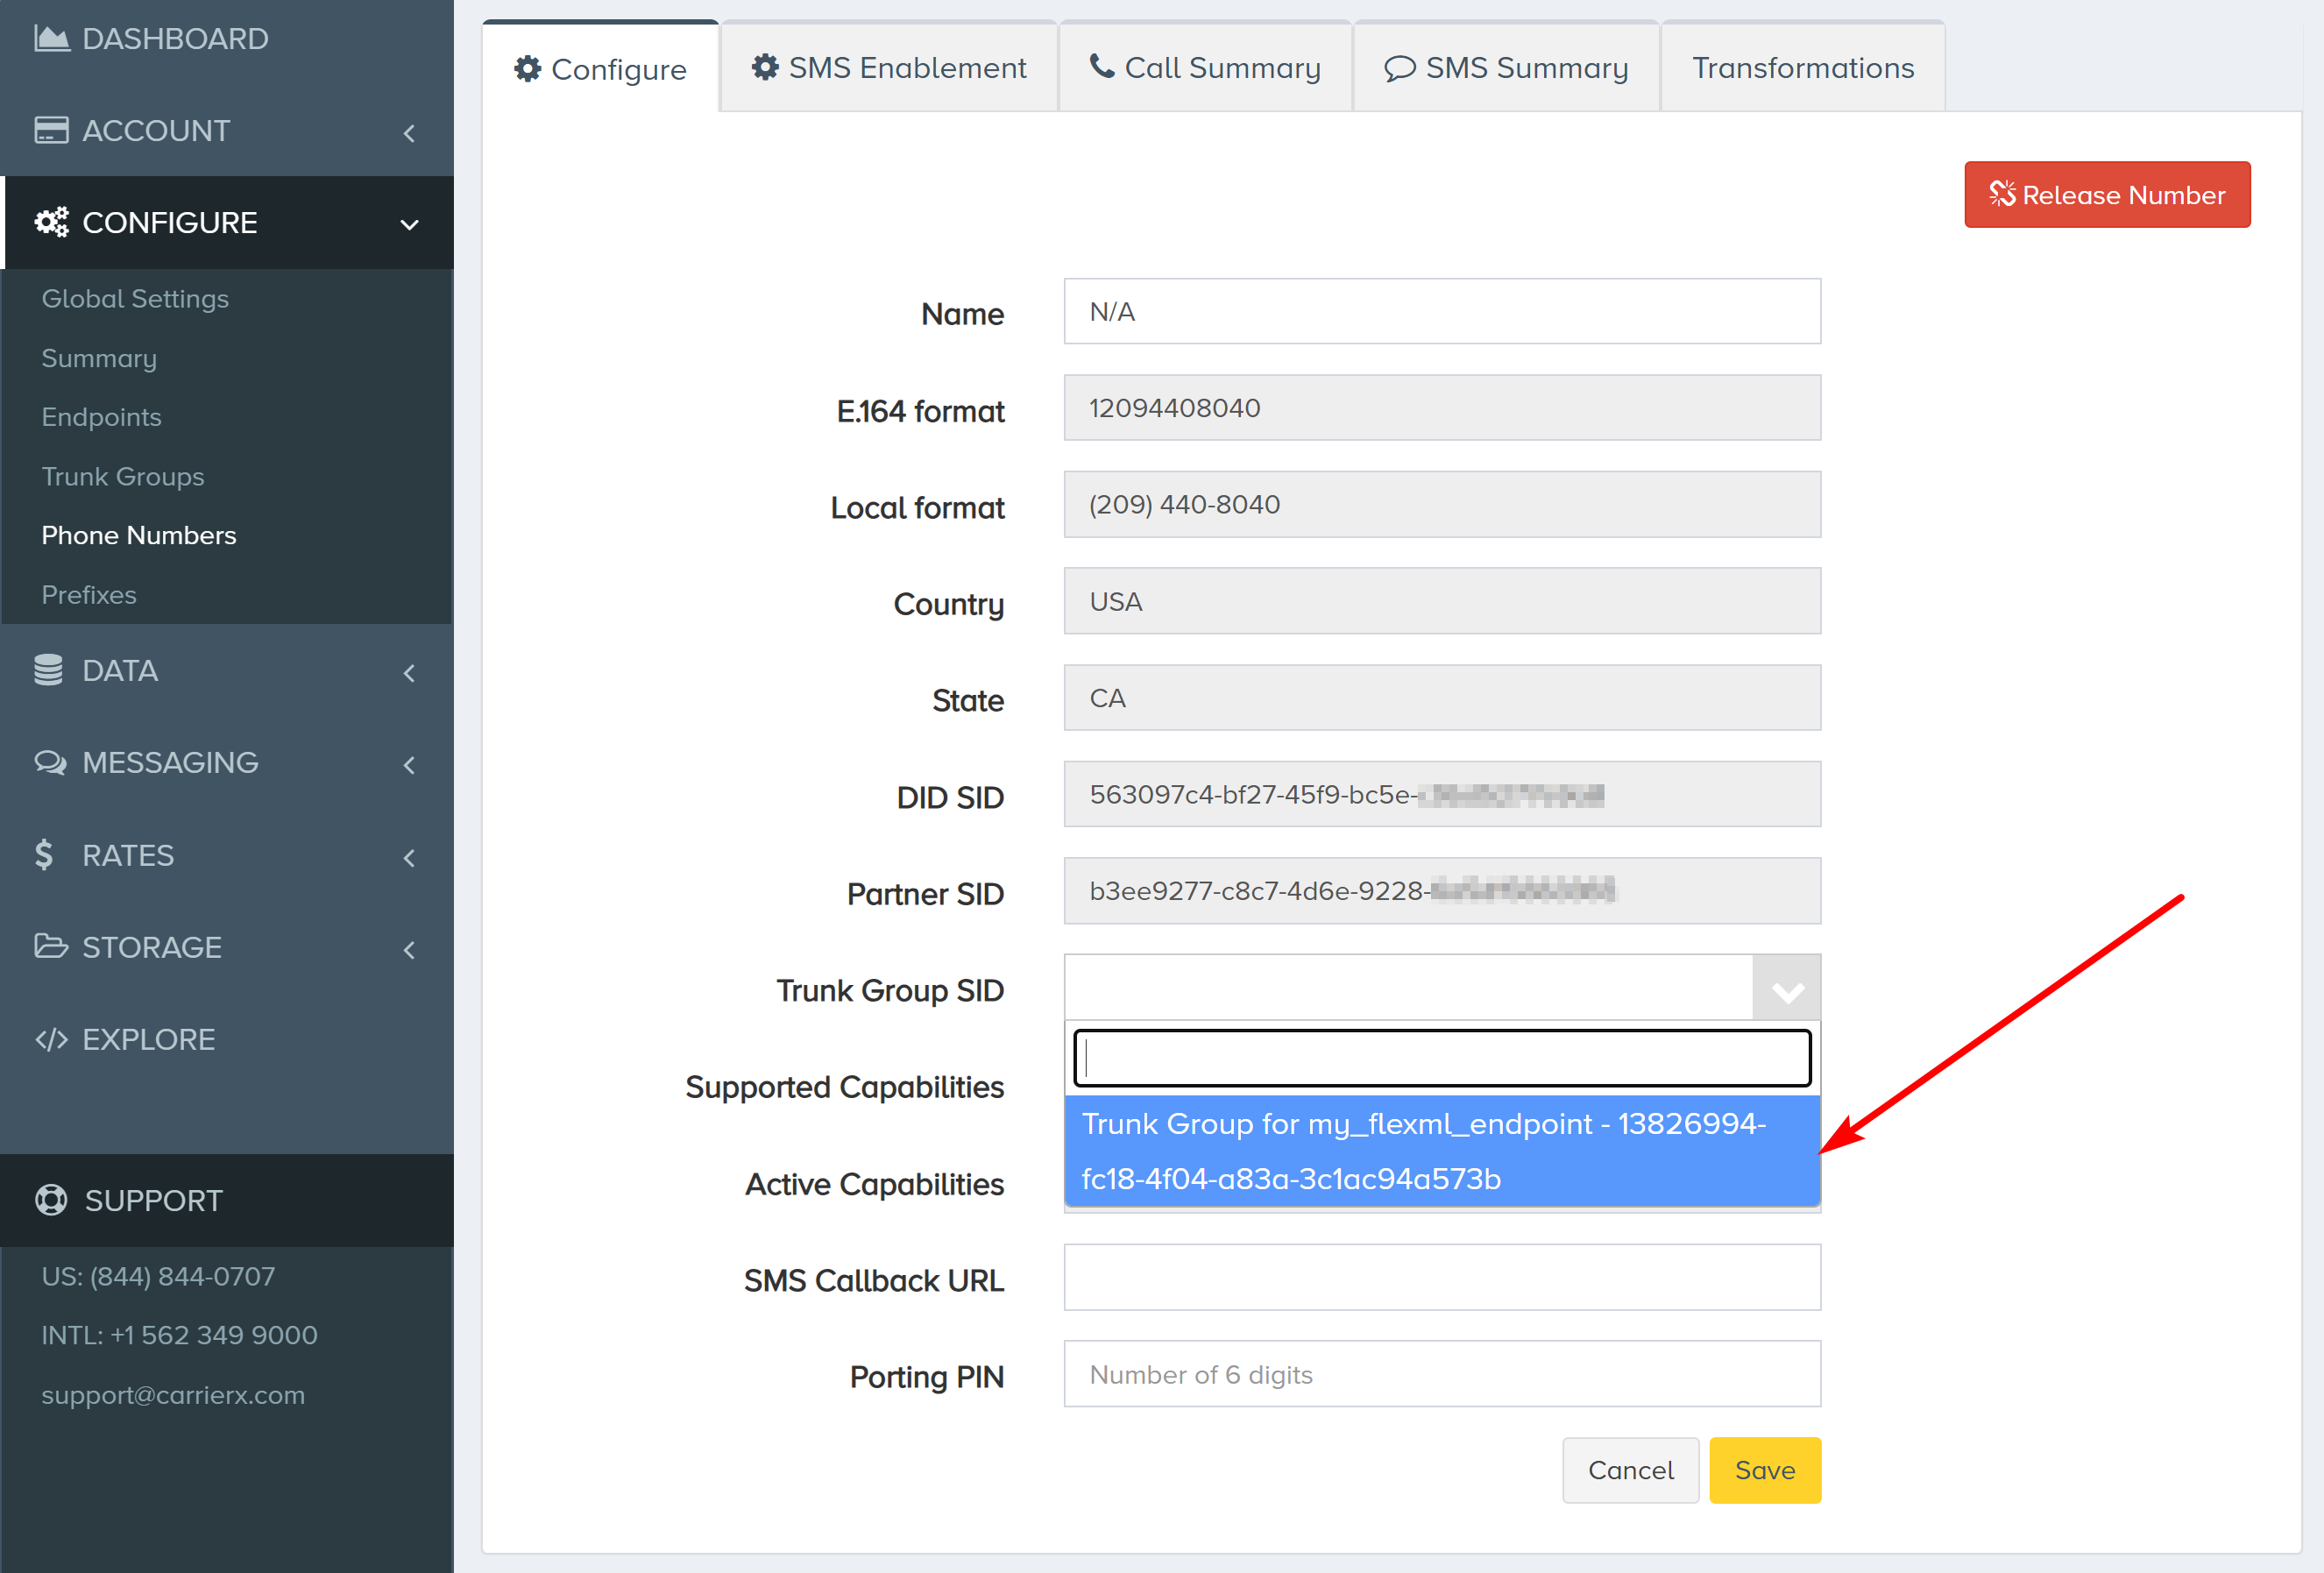
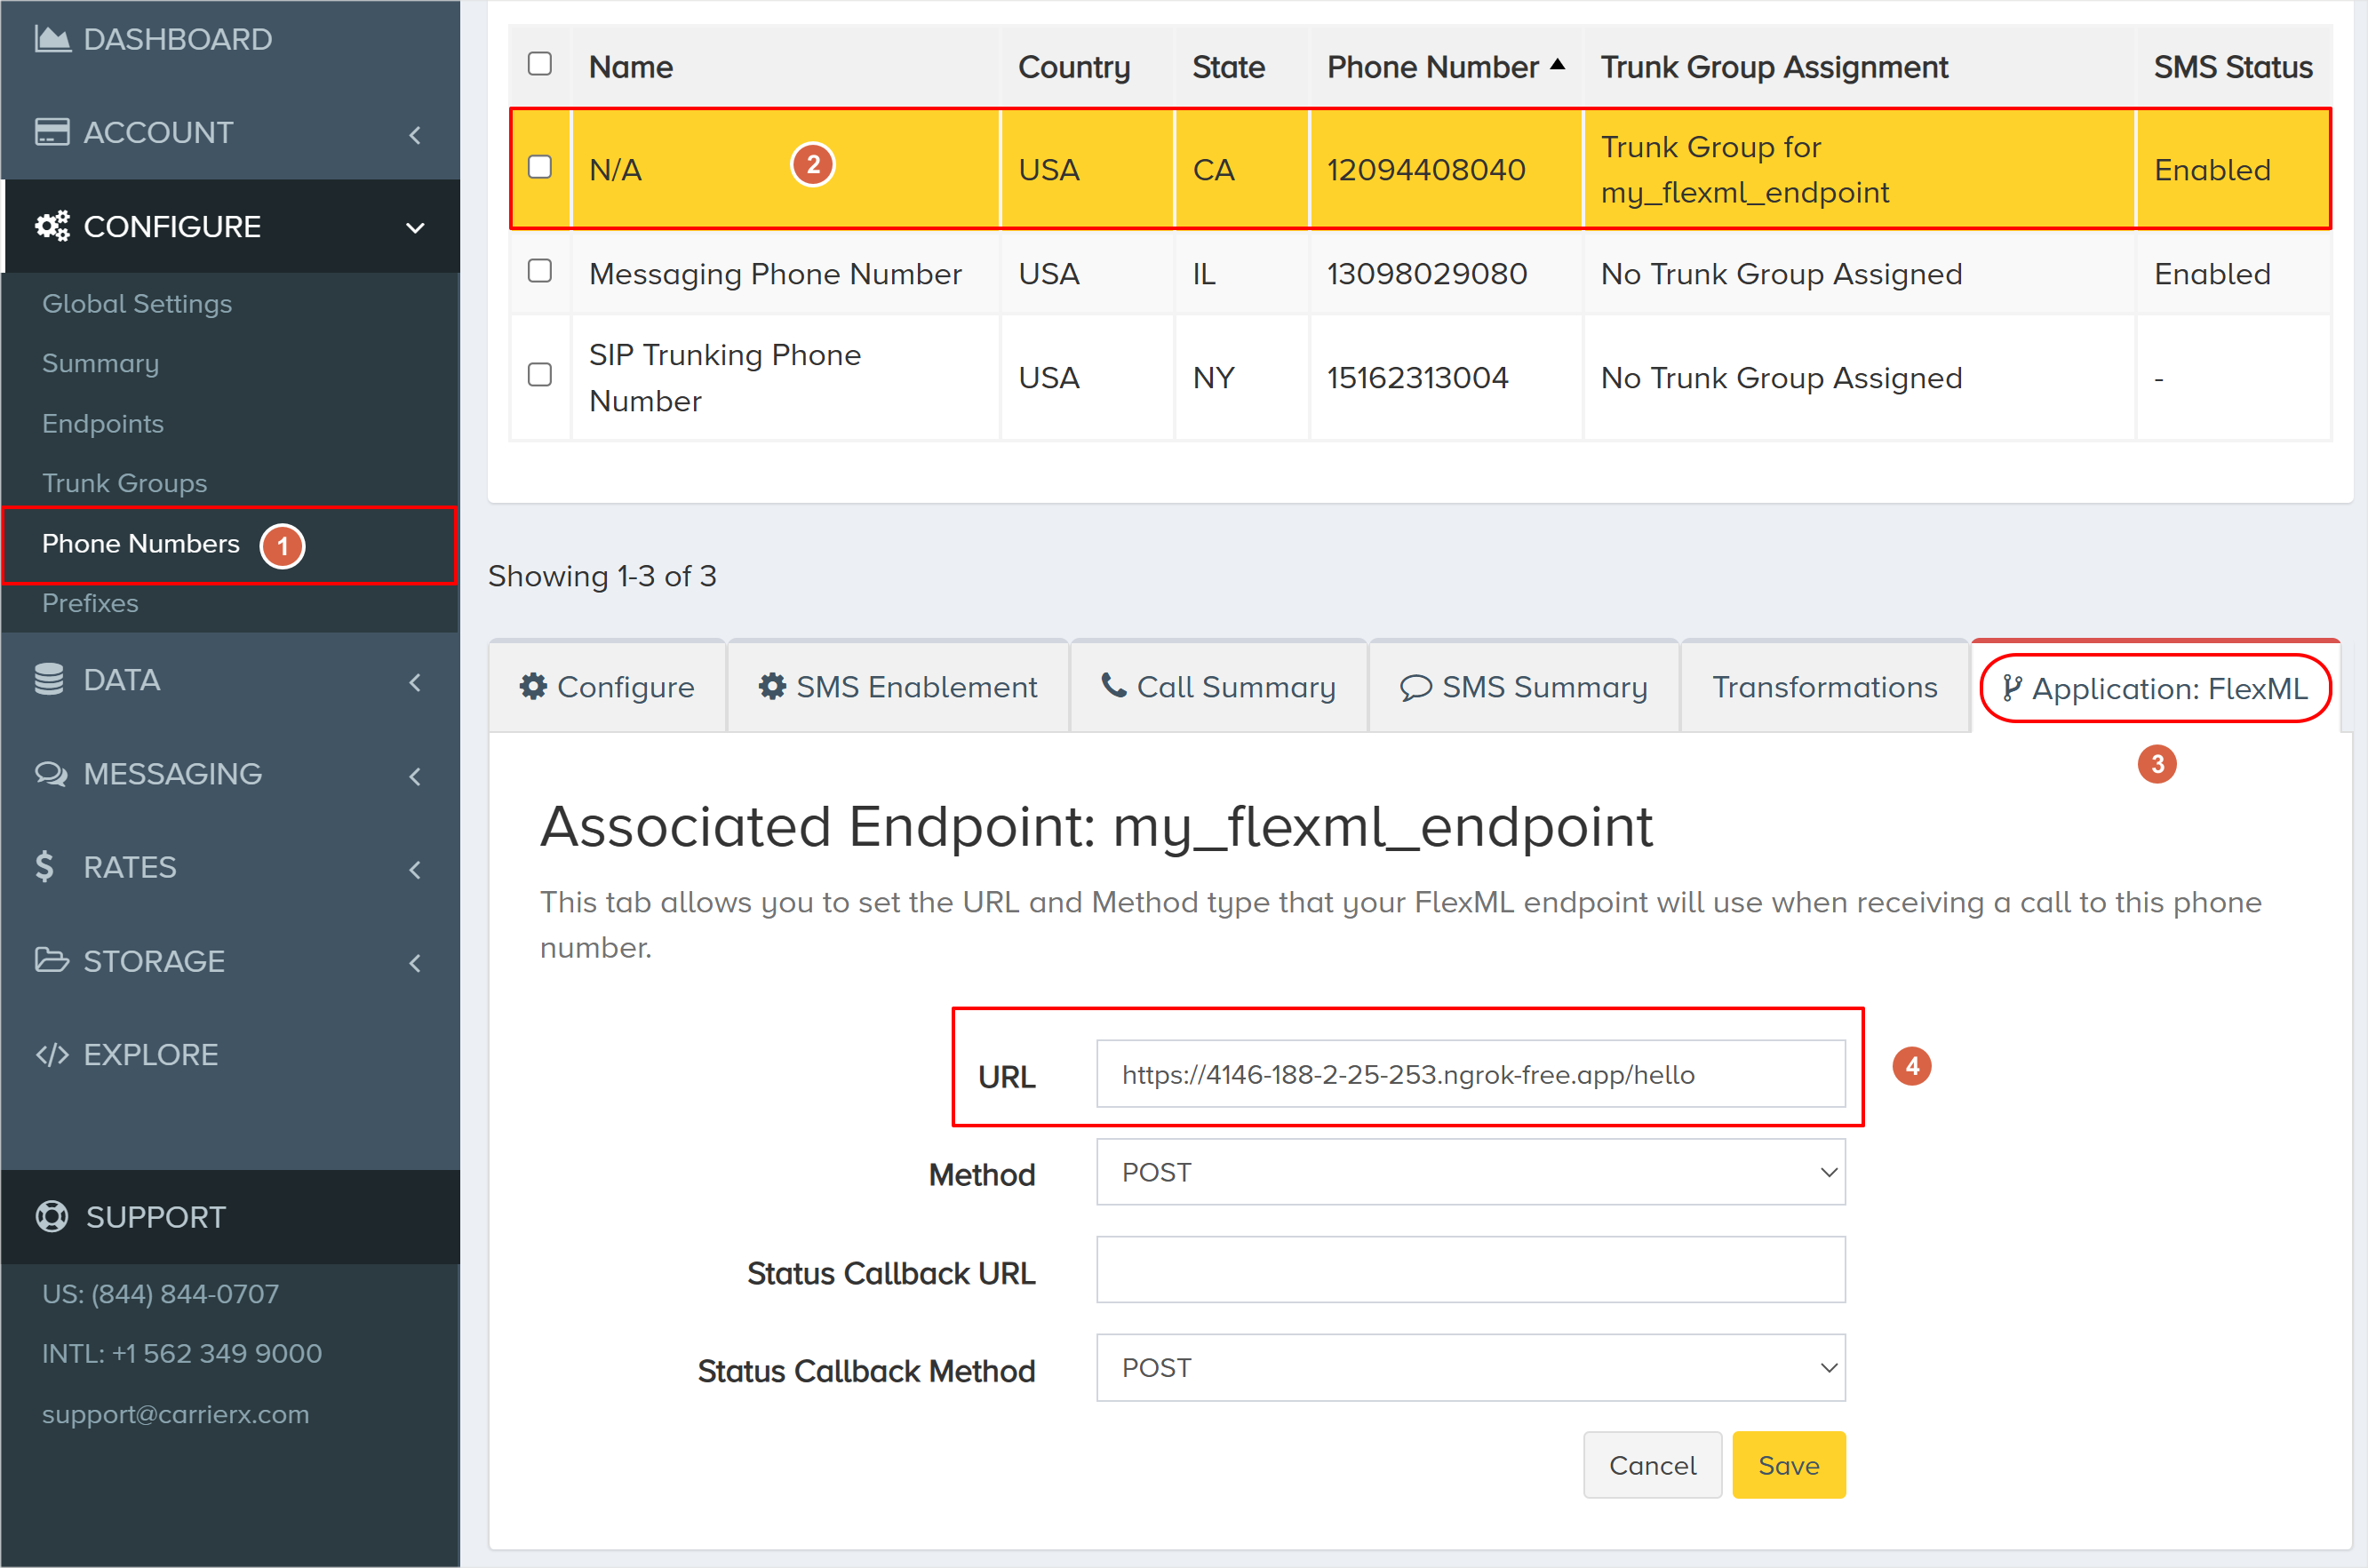
-
Navigate to CONFIGURE > Phone Numbers
-
Select a phone number associated with the FlexML endpoint trunk group
-
Navigate to Application: FlexML tab, click Edit
-
Enter your ngrok URL and click Save
Option B: Assign URL to an Endpoint
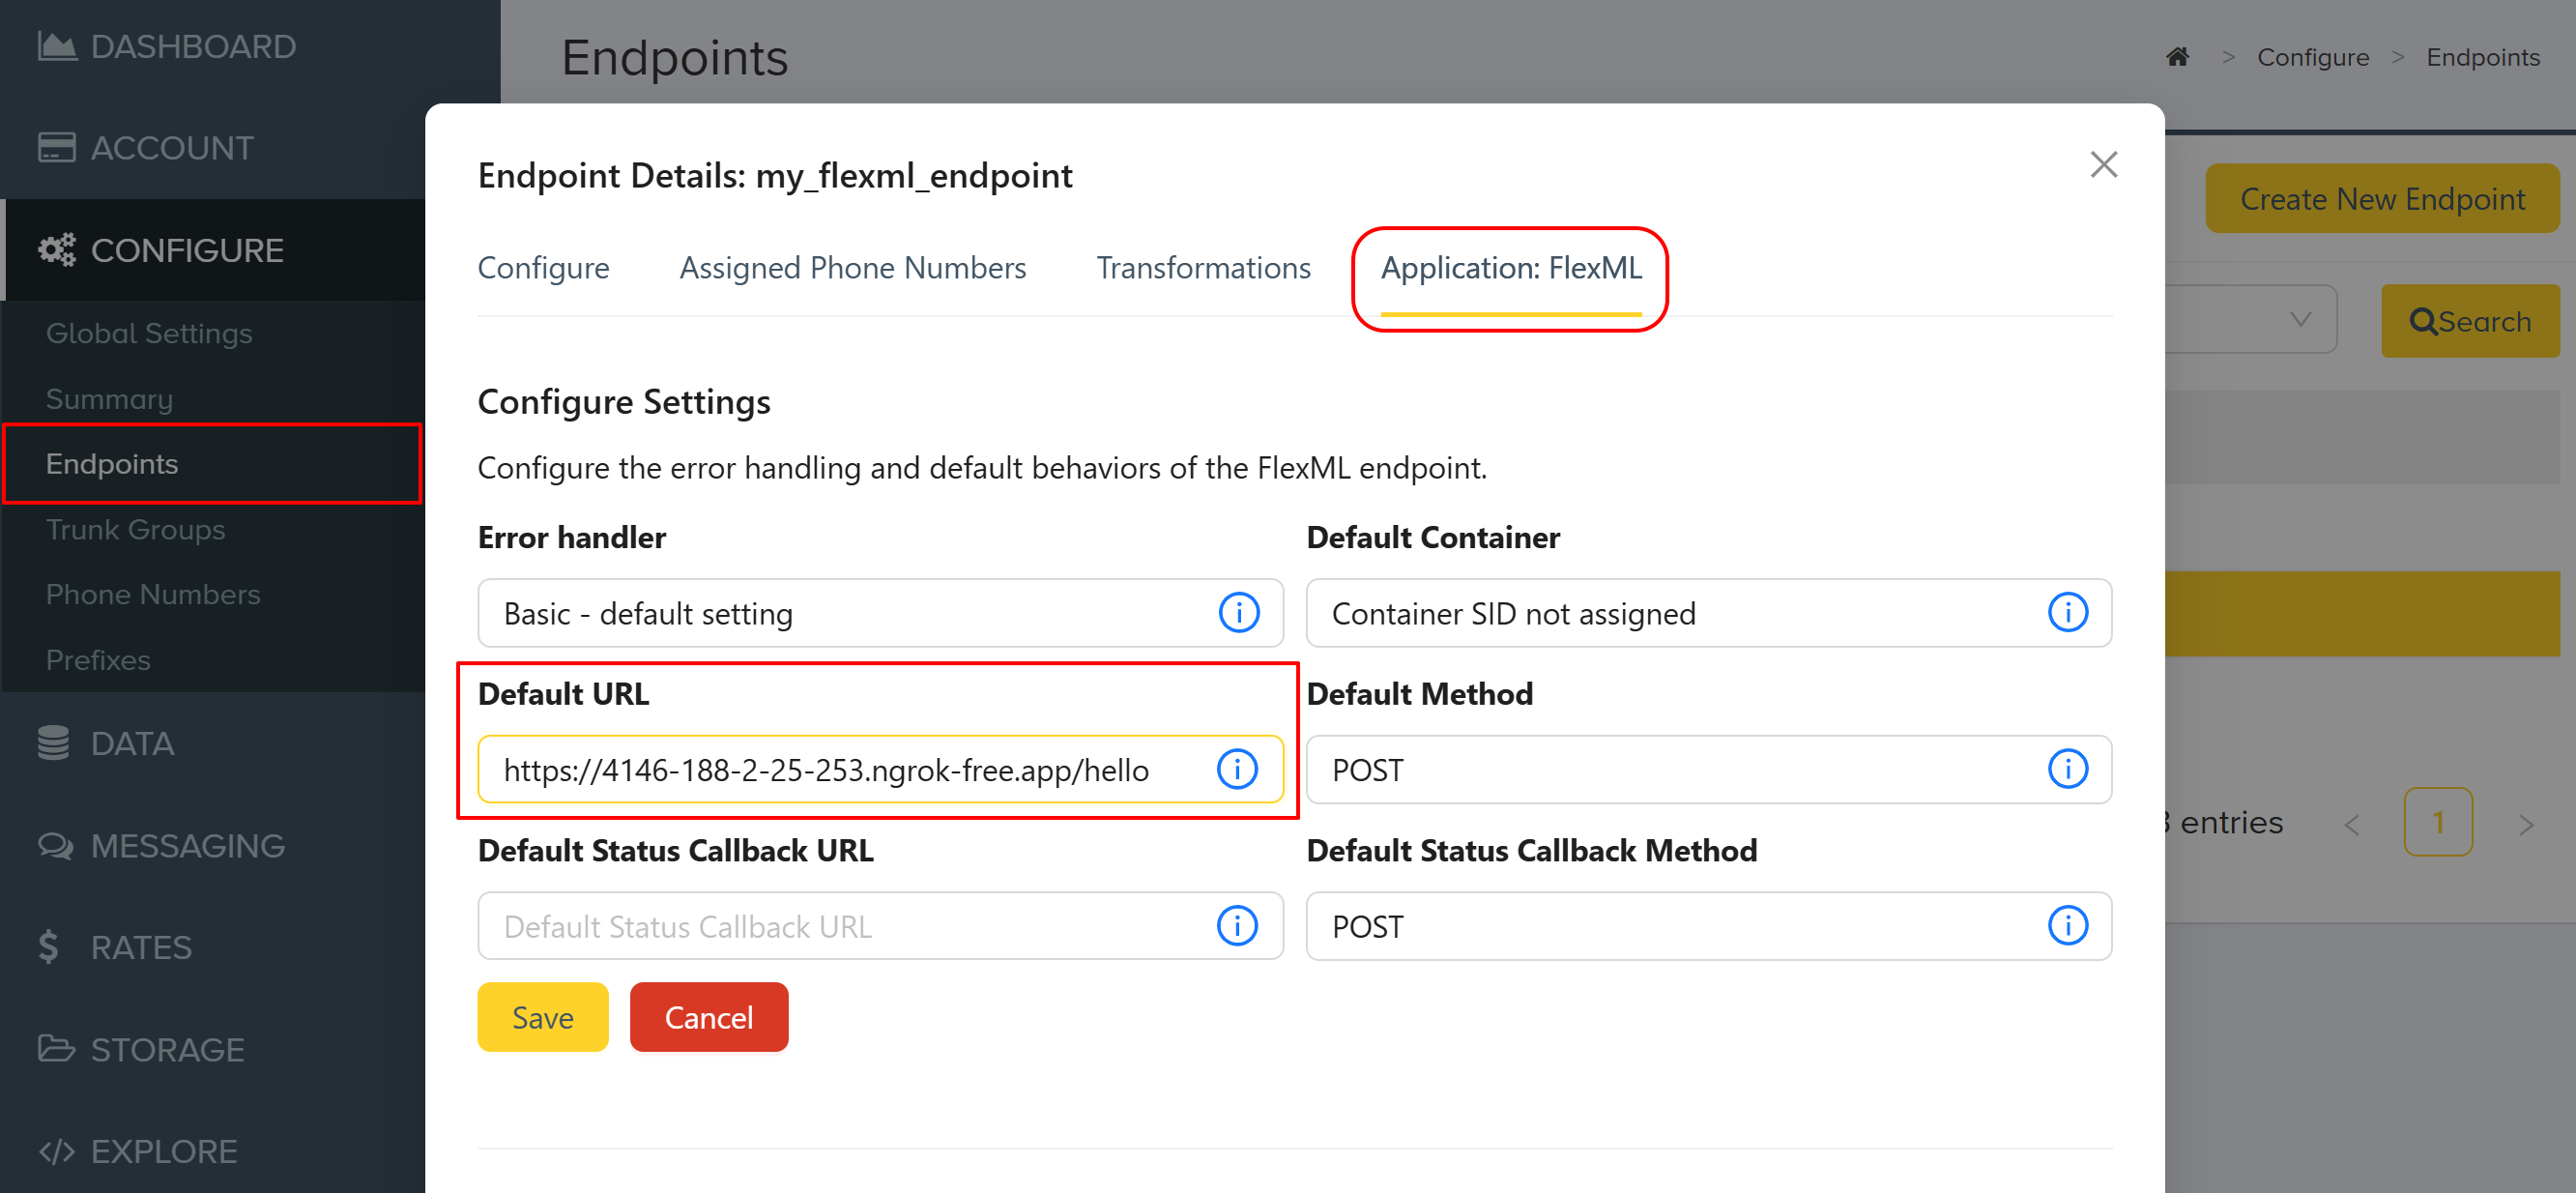
Now, we will learn how to assign a handler URL to the FlexML endpoint. This URL will be used by default for all calls to this endpoint if no URL is configured for the phone number.
-
Navigate to CONFIGURE > Endpoints
-
Select the FlexML endpoint that you would like to associate your link with
-
Navigate to Application: FlexML tab, click Edit
-
Set the Default URL and click Save
Inbound Call Flow
When a caller dials the DID, the call is routed the FlexML endpoint through the corresponding trunk group. The endpoint then sends a POST or GET request to the URL hosting the FlexML application. Based on the instructions provided in the application, the call is processed accordingly.

5. Make Outbound Calls
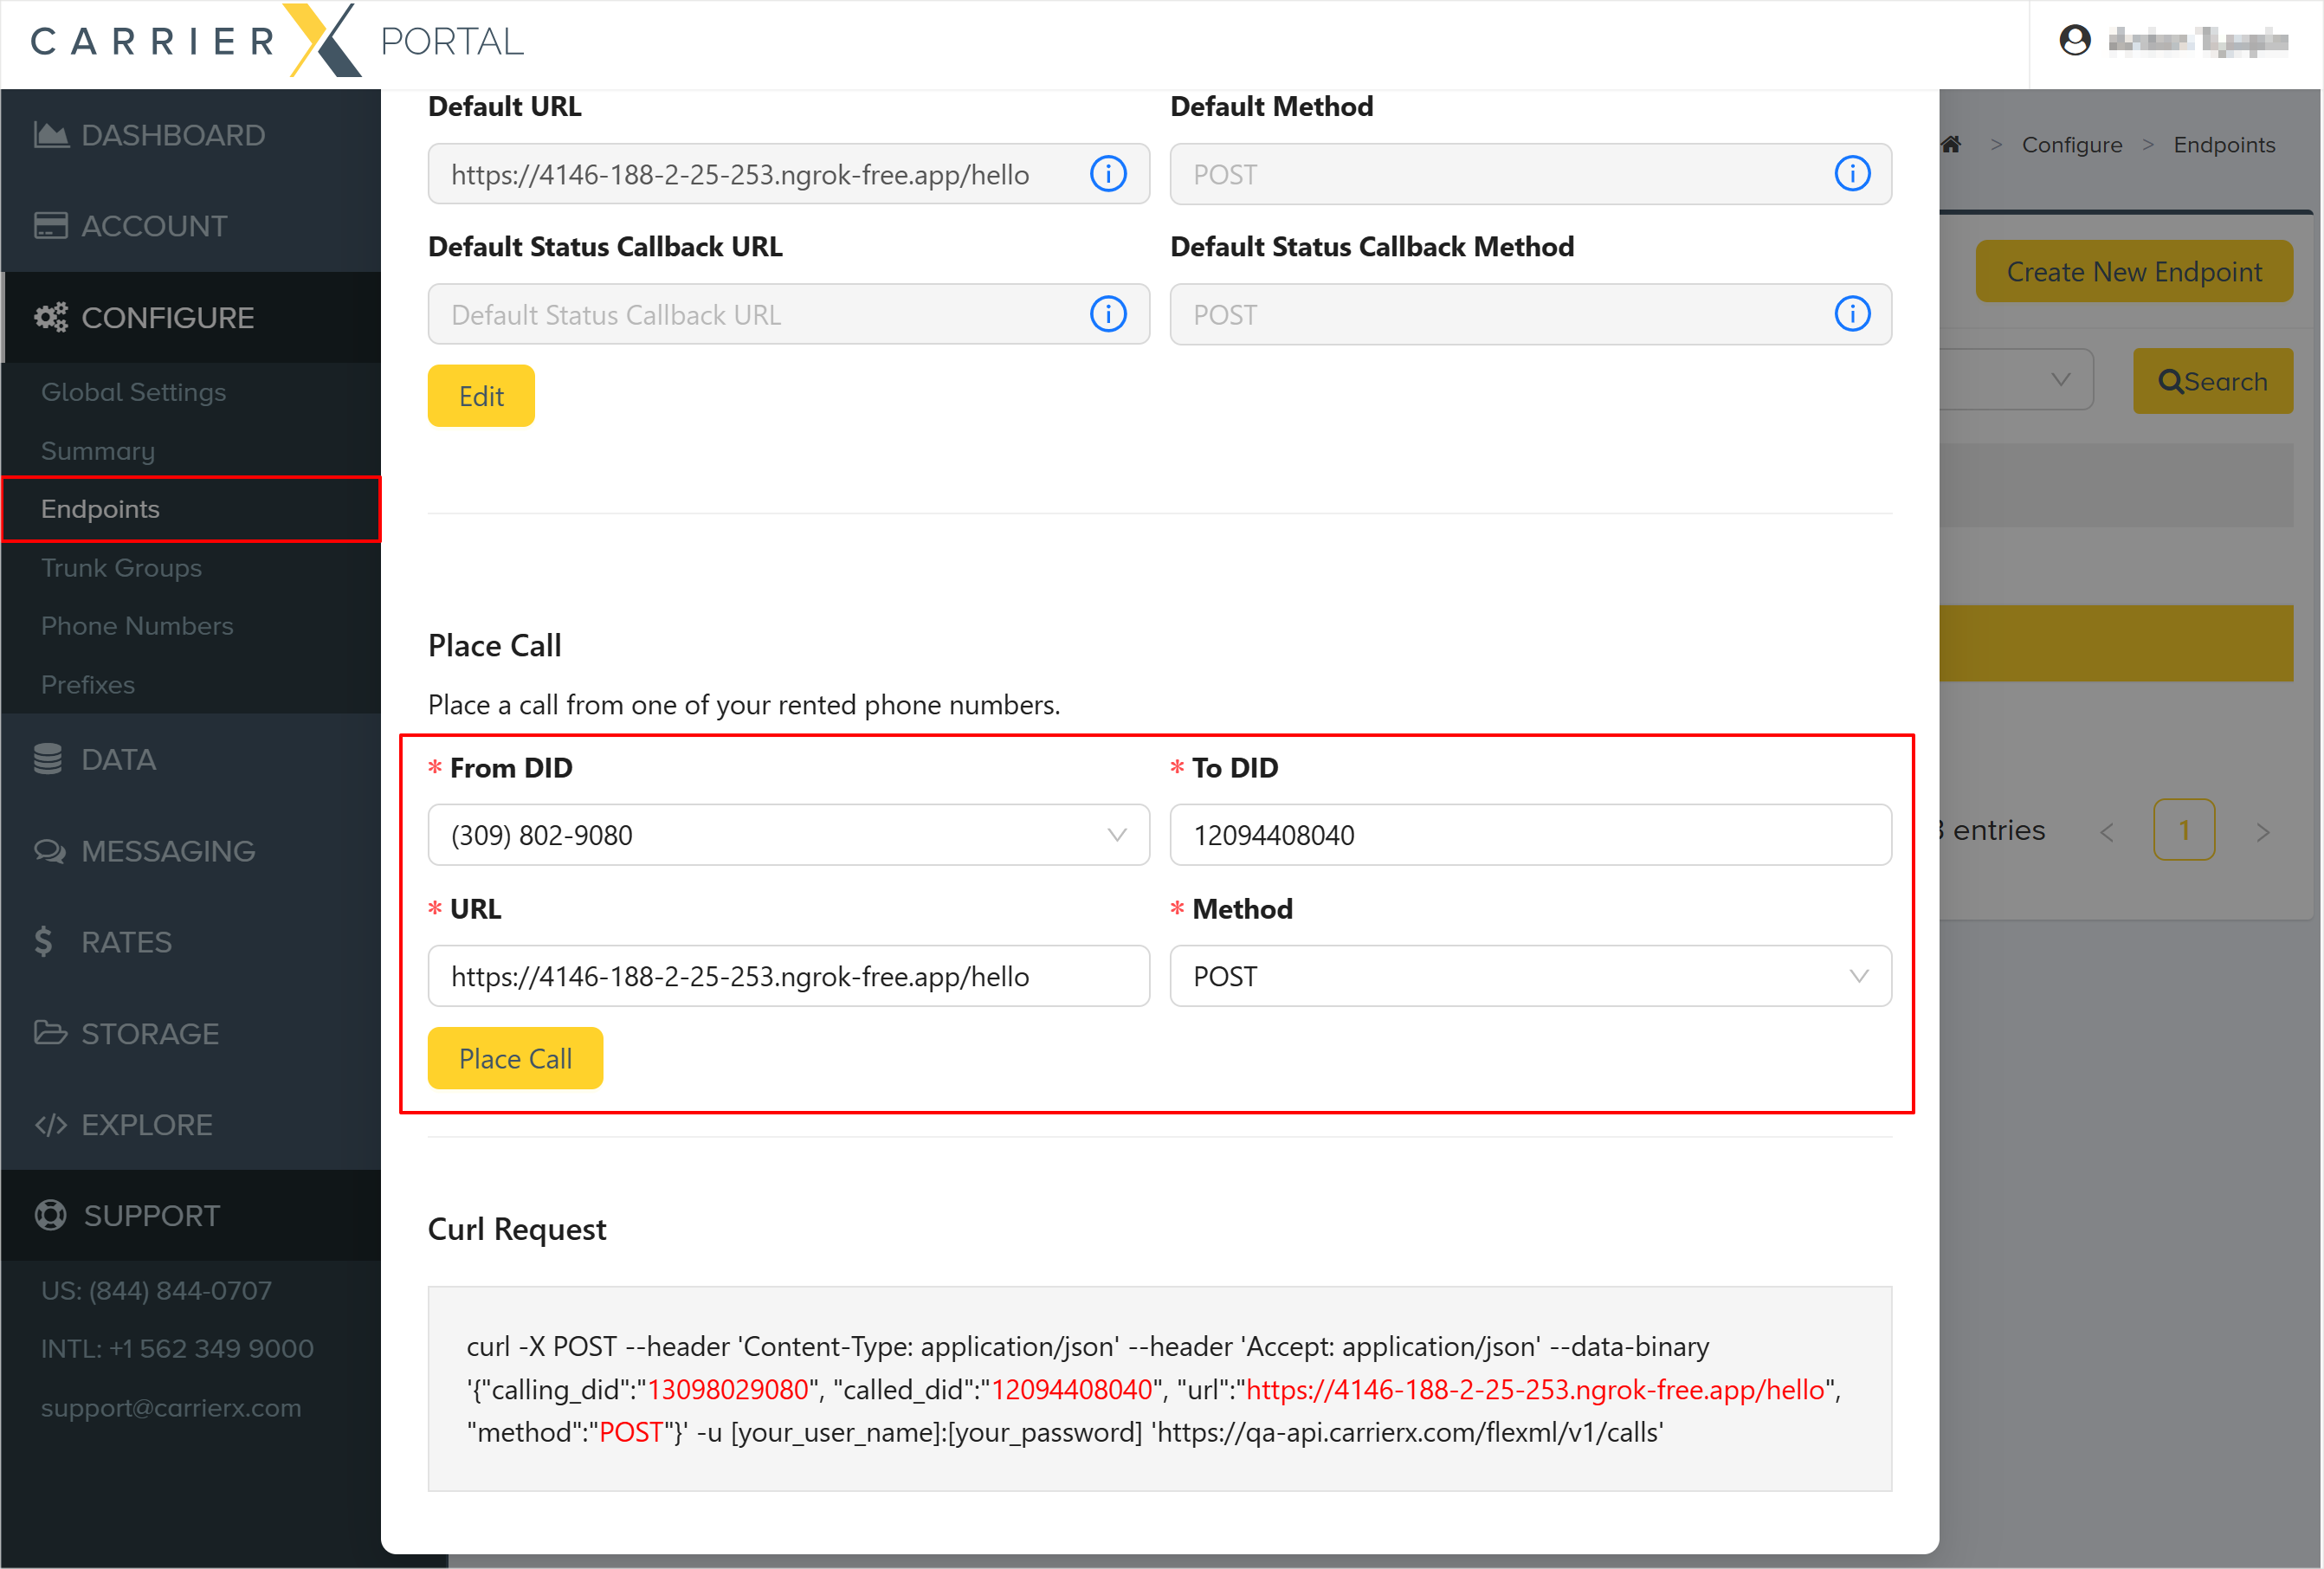
Make Outbound Calls via the Portal
First, let's make an outbound call via the Portal.
-
Navigate to CONFIGURE > Endpoints
-
Select the FlexML endpoint that you would like to make the outbound calls with
-
In the configuration window, scroll down to the Place Call section
-
Fill in the corresponding fields and in the Method field select
POST -
Click Place Call
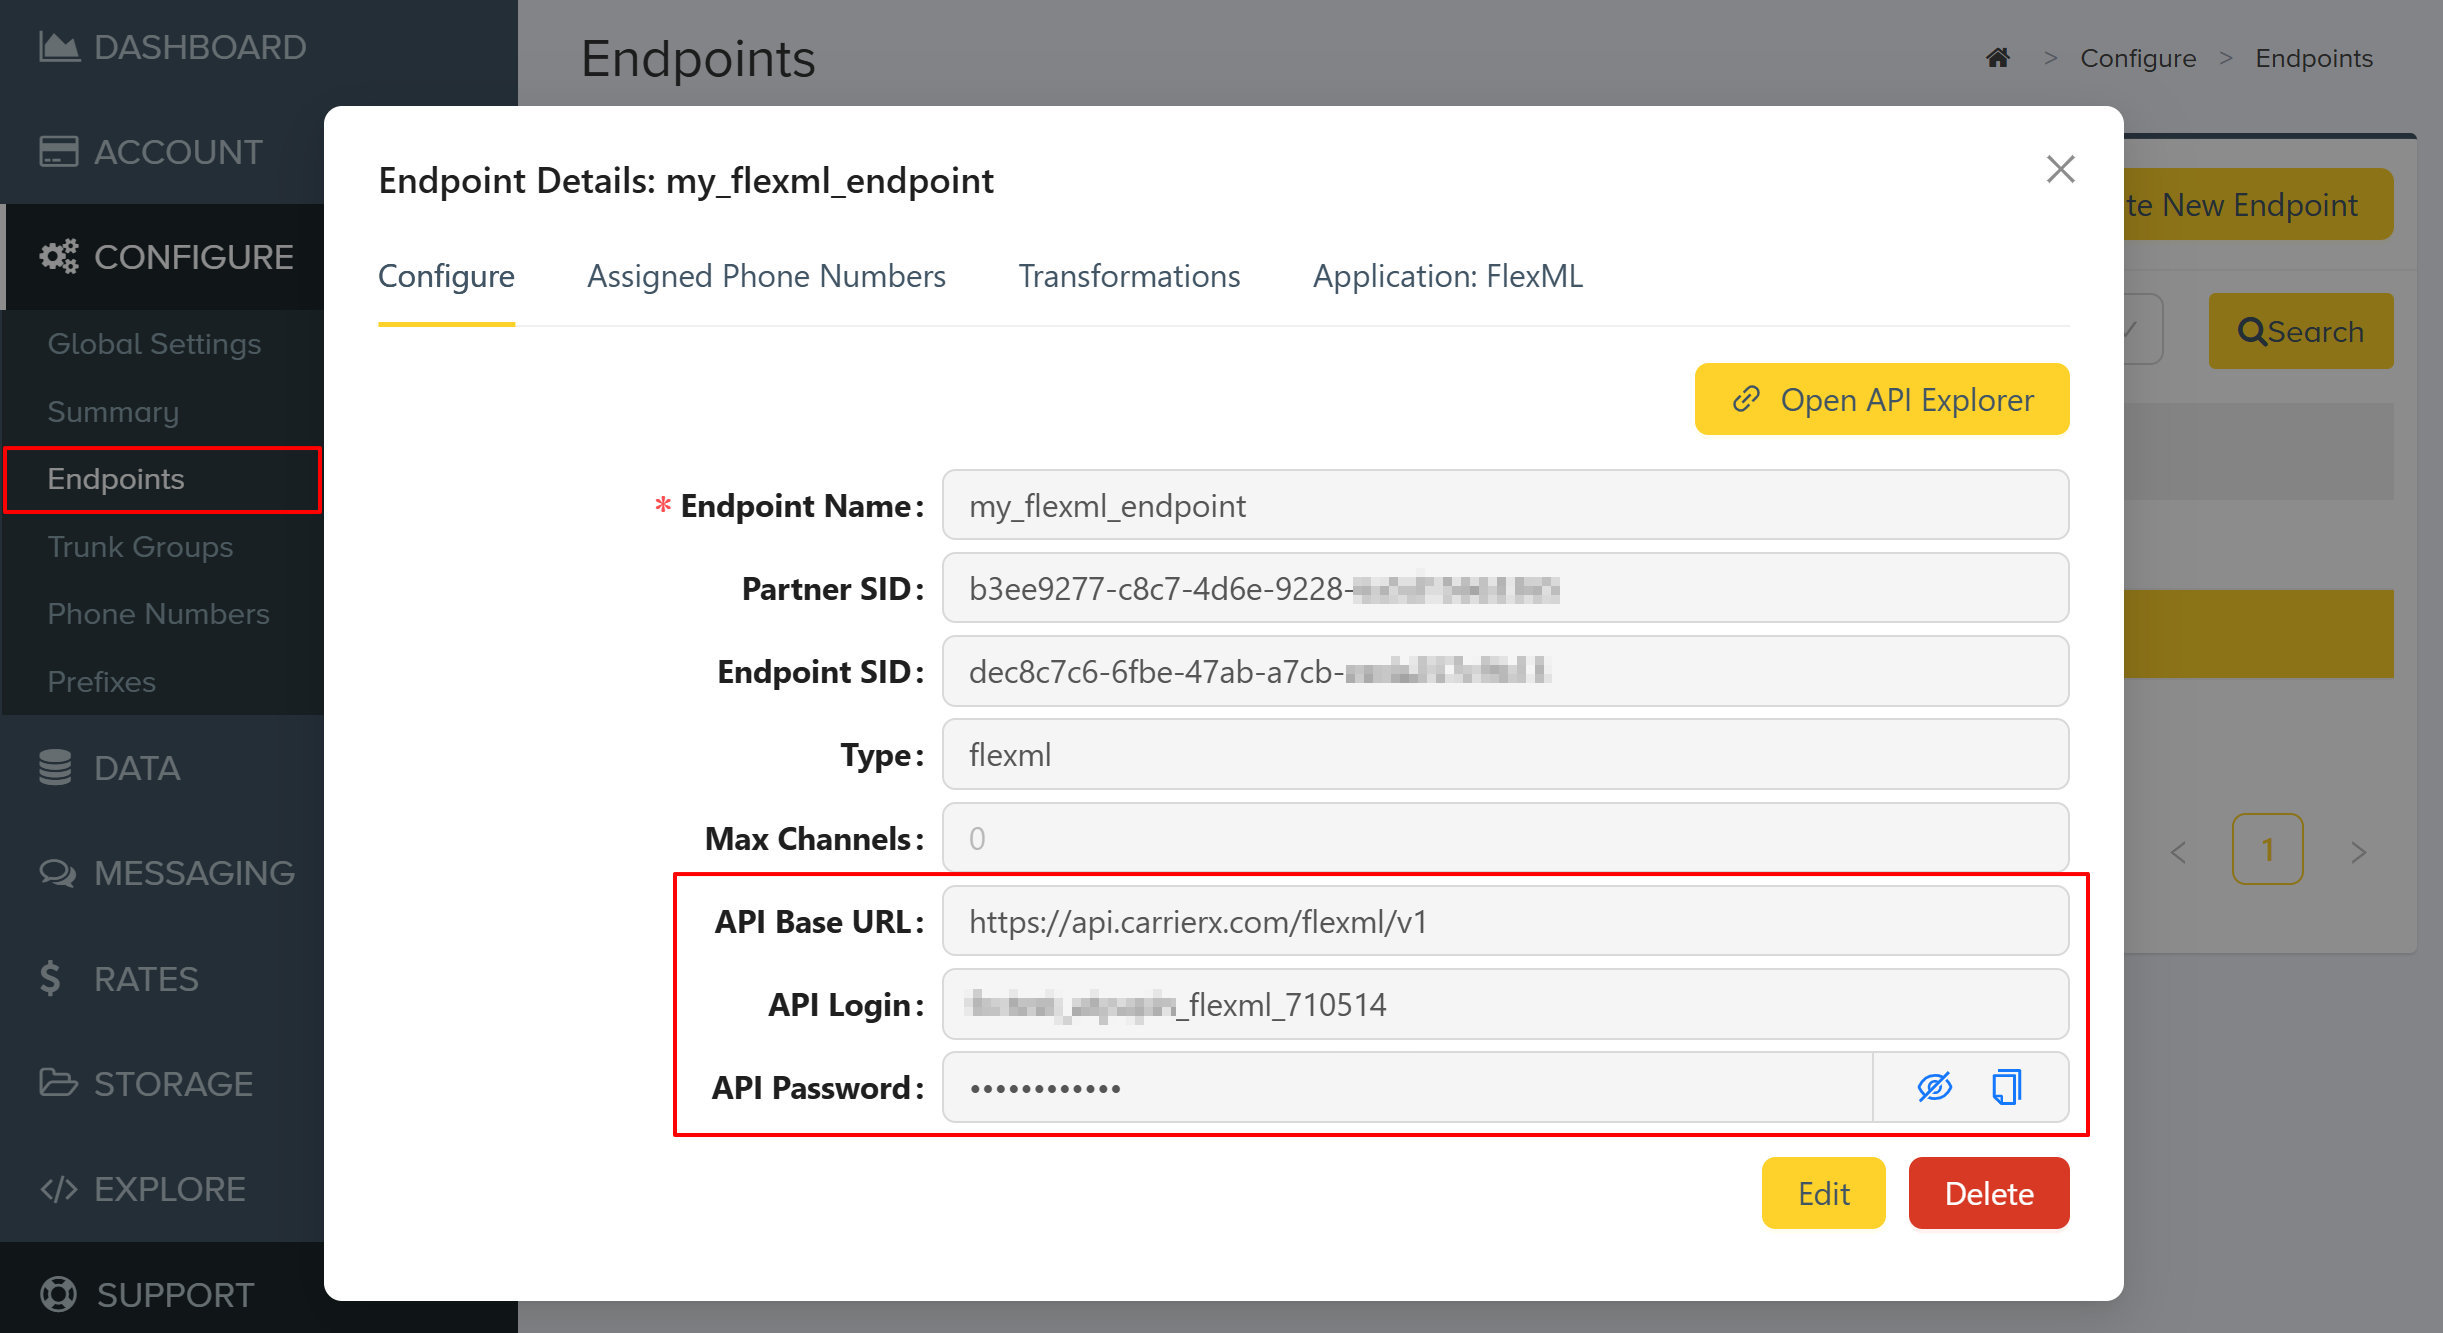
Make Outbound Calls via the API
Before making a request, we need to find our credentials for the FlexML endpoint we would like to create the outbound call from.
API Credentials
-
Navigate to CONFIGURE > Endpoints
-
Find your endpoint's unique credentials:
-
Form a
POSTrequest with at leastcalling_didandcalled_didpassed in the request body.We are also passing a value containing the URL for the simple FlexML voice application we created. If we do not pass a
urlfield and value, theurlwill default to the one set on the DID. This is useful if you do not want to set theurleach time in the FlexML instructions. Refer to the DIDs section in the FlexML API Reference for information on how to set the URL on the DID object.When
called_didanswers, a request will be made to the FlexML URL. In this example, the called party will hear the message that we configured in Step 3. Build a Voice Application section.Since no
delayfield or value is set, the call is placed immediately.
cURL Example
curl -X POST \
'https://api.carrierx.com/flexml/v1/calls' \
-H 'Content-Type: application/json' \
--data-binary '{"calling_did":"13098029080", "called_did":"12094408040", "url":"https://4146-188-2-25-253.ngrok-free.app/hello"}' \
-u '[your_flexml_endpoint_username]:[your_flexml_endpoint_password]'
Example Response
{
    "account_sid": "99844092-3fe2-4d94-b9b4-318fdf4255ce",
    "attributes": {},
    "call_sid": "52aa2963-be4d-4186-b344-7afa68969c3c",
    "called_did": "12094408040",
    "calling_did": "13098029080",
    "delay": 0,
    "date_created": "2025-05-15T20:24:15.736Z",
    "flexml": null,
    "method": "POST",
    "status": "created",
    "status_callback_method": "POST",
    "status_callback_url": null,
    "url": "https://4146-188-2-25-253.ngrok-free.app/hello"
}
A successful API response doesn't guarantee call completion. Verify your account has outbound calling enabled.
Outbound Call Flow
The FlexML application hosted on some URL is making an outbound call. This time the call is routed via the FlexML endpoint through the corresponding trunk group and your rented DID to a regular phone (landline or mobile).

5. Next Steps
- Explore the FlexML API Reference.
- Try building more complex call flows with additional verbs.