FlexML Advanced Play
Introduction
In this guide, you'll learn how to build a FlexML application using the Play verb. This advanced application includes all supported optional attributes available for the Play verb (except for digits, which serves as an alternative to the Dtmf verb. These attributes enable features like fast-forward, rewind, loop, and pause. We demonstrate using Python for our sample application server and routing, but you may use any language you are comfortable with.
Advanced Play Application
This section demonstrates building a simple FlexML application, using Python to serve our route.
1. Create Folder Structure
Use this folder structure:
flexml_play
    app.py
    static
        instruct.xml
app.py contains our route, and instruct.xml stores our FlexML instructions. instruct.xml is placed in the static directory so that it can be accessible to the route we'll write.
2. Build a Flask Server
Next, we'll set up a Flask server and create our route. Flask enables quick local server setup. Start by importing Flask and the Flask request module. request allows our app to process data sent to the browser.
Define a route that serves the FlexML code. Ensure that you add both GET and POST methods.
from flask import Flask, request
app = Flask(__name__, static_url_path='')

@app.route("/", methods=["GET", "POST"])
def home():
    return app.send_static_file('instruct.xml')

if __name__ == '__main__':
    app.run(debug=True)
3. Write a FlexML Application
After creating our route, we'll write our FlexML in the instruct.xml document.
Add FlexML Play with Basic Controls
All FlexML content is nested within a Response tag and Play verb. Inside the Play tags, add a file of your choosing. In this case, we added a podcast episode downloaded from Bullhorn that we have stored in a CarrierX container. Use a long file to properly test fast-forward and reverse commands. You may use the included links included in this tutorial in your sample application.
In the Play start-tag, add the following supported attributes:
controlSkip: the number of seconds that the file should fast-forward or reverse when we enter theforwardOnKeyorrewindOnKeykeys.forwardOnKey: the DTMF key that listeners of the file will enter to fast-forward the file.pauseOnKey: the DTMF key that listeners of the file will enter to pause the file.rewindOnKey: the DTMF key that listeners of the file will enter to rewind the file.strictForwardControl: the boolean value that determines whether or not to allowforwardOnKeyto reach the end of the file. If this value is set totrue, then anyforwardOnKeycommand that would forward past the end (or reach the end) of a file is ignored.
Beyond basic fast-forward and rewind controls, you can add commands to fast-forward and rewind in smaller increments.
minorControlSkip: the amount of seconds skipped forminorForwardOnKeyandminorRewindOnKey.minorForwardOnKey: the DTMF key that listeners enter to fast-forward the playback by the number of seconds set inminorControlSkip.minorRewindOnKey: the DMTF key that listeners enter to rewind the playback by the number of seconds set inminorControlSkip.
In the following example, you are able to fast-forward and rewind the recording by 15 second increments:
- to fast-forward, press
4; - to pause, press
2; - to rewind, press
6.
Finally, strictForwardControl is set to true, meaning that the file cannot be forwarded past the end. If you try to fast-forward past the end a file, the forward command will not work.
<Response>
    <Play
        controlSkip="15"
        forwardOnKey="4"
        pauseOnKey="2"
        rewindOnKey="6"
        strictForwardControl="true">
        https://storage.carrierx.com/c/d8b637fa-efa2-4d4d-817a-6b5f7f33e268/no_sleep_podcast.mp3
    </Play>
</Response>
Test Application
Now let's test the first lines of our application!
-
If you don't have Flask, install it using the following command:
Windows MacOS/Linux pip install flaskpip3 install flask -
Set the environment variable:
Windows MacOS/Linux set FLASK_APP=app.pyexport FLASK_APP=app.py -
Start the Flask server:
Windows MacOS/Linux python -m flask runpython3 -m flask run
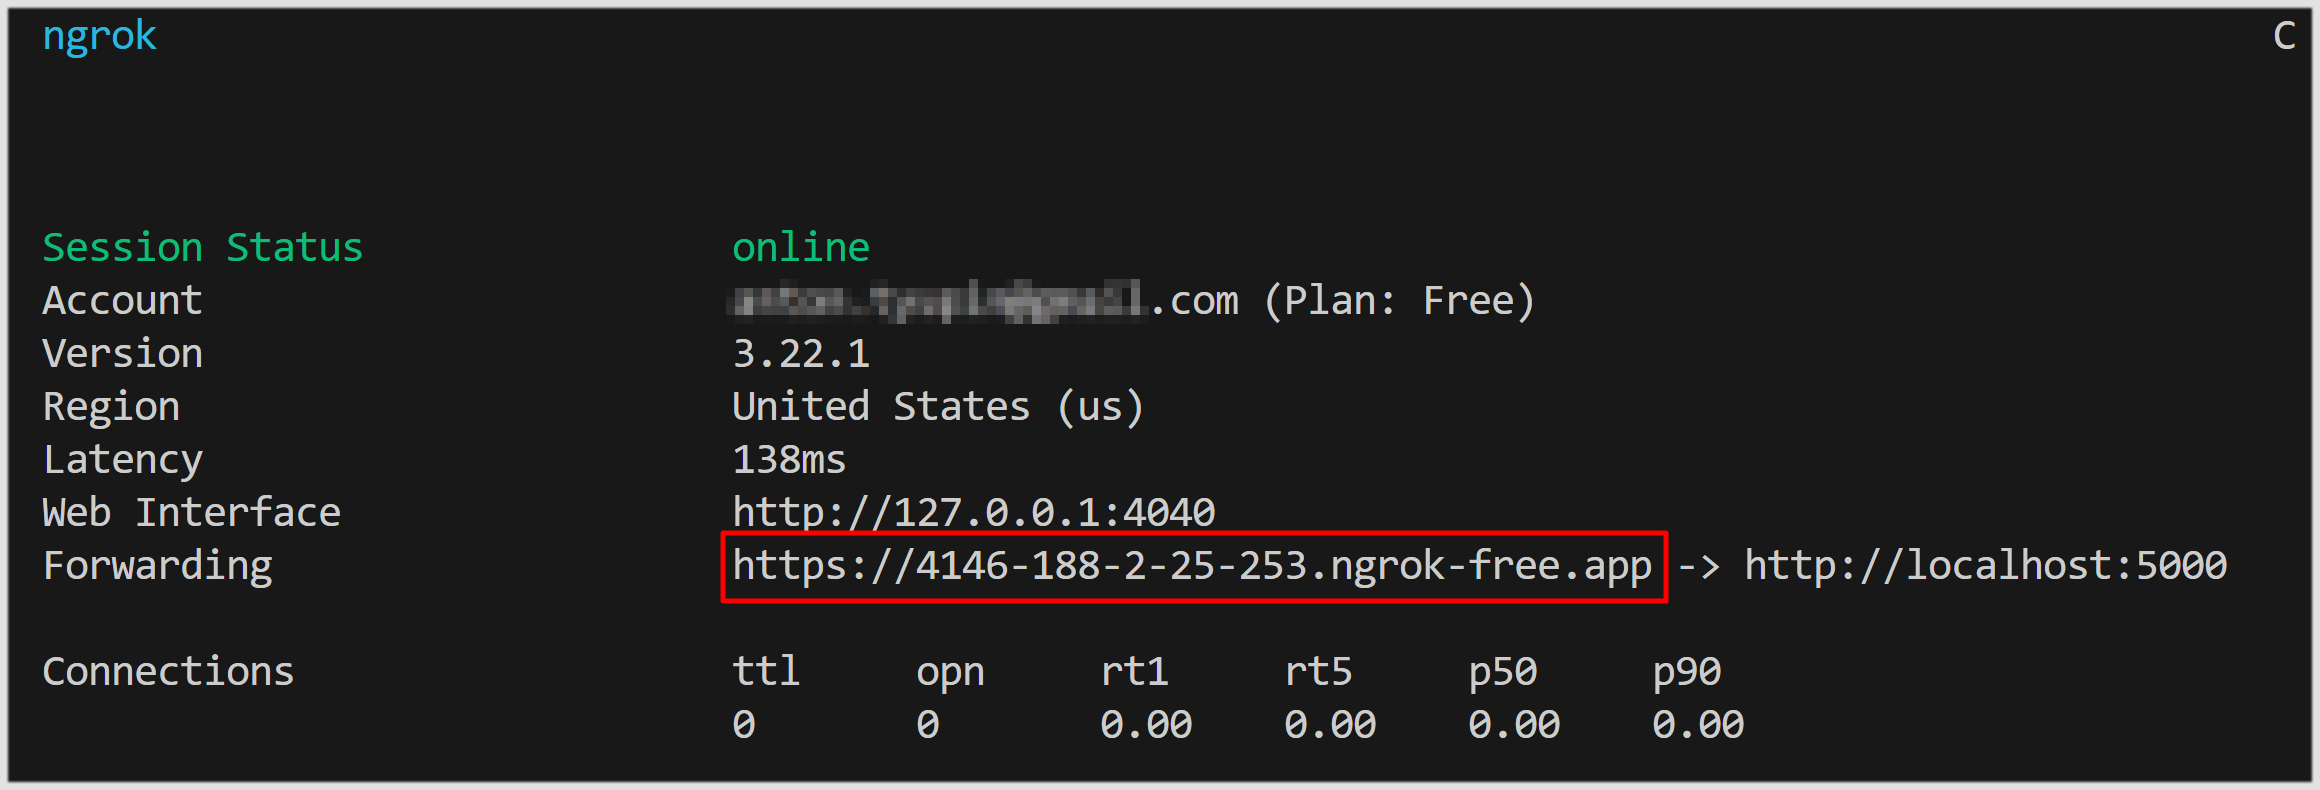
We will also need to expose the route publicly over the Internet. To do this, we can use the free ngrok tool. If you choose to use ngrok, you will need to follow the instructions on their website to download it. Alternatively, you may expose the URL any other way you choose. Once your Flask server is running, your terminal will list the port it's running on. Expose this port by running the following command through terminal. Make sure to swap out 5000 with the port that your Flask server is running on.
ngrok http 5000
ngrok will open a new terminal tab that will show you the http and https URLs that make the application publicly available over the Internet. Add the https ngrok link to either a FlexML endpoint or a DID associated with a FlexML endpoint. Refer to the FlexML Endpoint quick start guide to learn how.
Add More Playback Controls
Now that we have seen how to run and test this application, let's build onto it. In the code following, we're going to add some controls to restart and stop a file.
To your preexisting code, add the following attributes:
restartOnKey: the DMTF key that listeners will enter to restart the file.stopOnKey: the DMTF key to stop the playback. Note that you can set multiple DTMF values. If we set the value as3*, then you can press3or*to stop the playback.
In the following example, you will be able to press the 1 key to restart the file. You will also be able to press 3 or * to stop the playback.
<Response>
    <Play
        controlSkip="15"
        forwardOnKey="4"
        pauseOnKey="2"
        restartOnKey="1"
        rewindOnKey="6"
        stopOnKey="3*"
        strictForwardControl="true">
        https://storage.carrierx.com/c/d8b637fa-efa2-4d4d-817a-6b5f7f33e268/no_sleep_podcast.mp3
    </Play>
</Response>
Add Information Parameters
In this next portion of code, we will enable listeners to enter a DTMF key to obtain information about the controls available when interacting with the file.
Add three new attributes to your code:
informationAudioUrl: the URL of the audio that will play wheninformationOnKeyis pressed. After this file has been played once, normal playback resumes.informationOnKey: the DTMF key that listeners will enter to pause the current playback and play theinformationAudioUrlfile.pauseAudioUrl: the URL of the audio to play while playback is paused bypauseOnKey. This audio is played on loop. There is a default comfort noise.
In the following example, you can press the 9 key to play the informationAudioUrl audio file. pauseAudioUrl is the file that will play when the main audio file is paused.
<Response>
    <Say>
        Once the playback starts, press 9 to hear the options menu.
    </Say>
    <Play
        controlSkip="15"
        forwardOnKey="4"
        informationAudioUrl="https://storage.carrierx.com/c/4e33f4a8-4c04-4da0-9896-9550164ed296/informationAudioUrl.mp3"
        informationOnKey="9"
        pauseAudioUrl="https://storage.carrierx.com/c/4e33f4a8-4c04-4da0-9896-9550164ed296/pauseAudioUrl.mp3"
        pauseOnKey="2"
        restartOnKey="1"
        rewindOnKey="6"
        stopOnKey="3*"
        strictForwardControl="true">
        https://storage.carrierx.com/c/d8b637fa-efa2-4d4d-817a-6b5f7f33e268/no_sleep_podcast.mp3
    </Play>
</Response>
Add File Looping
Next, we will add functionality to be able to control looping of the file. Add the following to your code:
loop: the number of times that the file will be played.loopPause: The number of seconds between each repetition.
In the following, the file will play twice (once initially plus one loop) because loop is set to 2. 5 seconds will elapse between each loop.
<Response>
    <Play
        loop="2"
        loopPause="5">
        https://storage.carrierx.com/c/d8b637fa-efa2-4d4d-817a-6b5f7f33e268/piano.wav
    </Play>
    <Say>
        Once the playback starts, press 9 to hear the options menu.
    </Say>
    <Play
        controlSkip="15"
        forwardOnKey="4"
        informationAudioUrl="https://storage.carrierx.com/c/4e33f4a8-4c04-4da0-9896-9550164ed296/informationAudioUrl.mp3"
        informationOnKey="9"
        pauseAudioUrl="https://storage.carrierx.com/c/4e33f4a8-4c04-4da0-9896-9550164ed296/pauseAudioUrl.mp3"
        pauseOnKey="2"
        restartOnKey="1"
        rewindOnKey="6"
        stopOnKey="3*"
        strictForwardControl="true">
        https://storage.carrierx.com/c/d8b637fa-efa2-4d4d-817a-6b5f7f33e268/no_sleep_podcast.mp3
    </Play>
</Response>
Make Audio Play in Background
Now let's make the URL audio file play in the background. Add the following supported attribute:
background: the boolean value that determines whether or not the playback occurs in the background. If this attribute is set totrue, control will pass to the next verb but the audio file will continue to play in the background.
In the following, we have enabled an audio file to play in the background.
<Response>
    <Play
        background="true">
        https://storage.carrierx.com/c/d8b637fa-efa2-4d4d-817a-6b5f7f33e268/spooky_background.mp3
    </Play>
    <Play
        loop="2"
        loopPause="5">
        https://storage.carrierx.com/c/d8b637fa-efa2-4d4d-817a-6b5f7f33e268/piano.wav
    </Play>
    <Say>
        Once the playback starts, press 9 to hear the options menu.
    </Say>
    <Play
        controlSkip="15"
        forwardOnKey="4"
        informationAudioUrl="https://storage.carrierx.com/c/4e33f4a8-4c04-4da0-9896-9550164ed296/informationAudioUrl.mp3"
        informationOnKey="9"
        pauseAudioUrl="https://storage.carrierx.com/c/4e33f4a8-4c04-4da0-9896-9550164ed296/pauseAudioUrl.mp3"
        pauseOnKey="2"
        rewindOnKey="6"
        restartOnKey="1"
        stopOnKey="3*"
        strictForwardControl="true">
        https://storage.carrierx.com/c/d8b637fa-efa2-4d4d-817a-6b5f7f33e268/no_sleep_podcast.mp3
    </Play>
</Response>
Add Support for Streaming Files
Let's go over streaming for files that are not prerecorded. We will also set a 10 second time limit for the recording while streaming. Add the following two supported attributes:
-
streaming: the boolean value that determines whether or not the URL is prerecorded or currently streaming. Set the value tofalseif the URL is a prerecorded file, andtrueif the URL is a real-time recording.noteNote that setting the streaming value to
truewill disableforwardOnKeyandrewindOnKeyif they are defined. -
timeLimit: the number of seconds that the stream will last if streaming is set totrue.
In the following, rather than playing a prerecorded file, we are streaming. The stream will play for 10 seconds before the code moves onto the next verb.
<Response>
    <Play
        streaming="true"
        timeLimit="10">
        http://us4.internet-radio.com:8193
    </Play>
    <Play
        background="true">
        https://storage.carrierx.com/c/d8b637fa-efa2-4d4d-817a-6b5f7f33e268/spooky_background.mp3
    </Play>
    <Play
        loop="2"
        loopPause="5">
        https://storage.carrierx.com/c/d8b637fa-efa2-4d4d-817a-6b5f7f33e268/piano.wav
    </Play>
    <Say>
        Once the playback starts, press 9 to hear the options menu.
    </Say>
    <Play
        controlSkip="15"
        forwardOnKey="4"
        informationAudioUrl="https://storage.carrierx.com/c/4e33f4a8-4c04-4da0-9896-9550164ed296/informationAudioUrl.mp3"
        informationOnKey="9"
        pauseAudioUrl="https://storage.carrierx.com/c/4e33f4a8-4c04-4da0-9896-9550164ed296/pauseAudioUrl.mp3"
        pauseOnKey="2"
        restartOnKey="1"
        rewindOnKey="6"
        stopOnKey="3*"
        strictForwardControl="true">
        https://storage.carrierx.com/c/d8b637fa-efa2-4d4d-817a-6b5f7f33e268/no_sleep_podcast.mp3
    </Play>
</Response>
Allow Buffered Playback
Let's add some buffer to account for the playback loading. Additionally, we'll add a skip value, which will start a playback after that given number of seconds. Add the following attributes to your code:
preBuffer: the amount of time (in seconds) to buffer the remote file before starting playback, preventing the playback from catching up to a download still in progress.skip: the number of seconds into a file that it will start playing.
In the following, the playback will start once 5 seconds have been downloaded. And the file itself will start playing 2 seconds in.
<Response>
    <Play
        streaming="true"
        timeLimit="10">
        http://us4.internet-radio.com:8193
    </Play>
    <Play
        background="true">
        https://storage.carrierx.com/c/d8b637fa-efa2-4d4d-817a-6b5f7f33e268/spooky_background.mp3
    </Play>
    <Play
        loop="2"
        loopPause="5">
        https://storage.carrierx.com/c/d8b637fa-efa2-4d4d-817a-6b5f7f33e268/piano.wav
    </Play>
    <Say>
        Once the playback starts, press 9 to hear the options menu.
    </Say>
    <Play
        controlSkip="15"
        forwardOnKey="4"
        informationAudioUrl="https://storage.carrierx.com/c/4e33f4a8-4c04-4da0-9896-9550164ed296/informationAudioUrl.mp3"
        informationOnKey="9"
        pauseAudioUrl="https://storage.carrierx.com/c/4e33f4a8-4c04-4da0-9896-9550164ed296/pauseAudioUrl.mp3"
        pauseOnKey="2"
        preBuffer="5"
        restartOnKey="1"
        rewindOnKey="6"
        skip="2"
        stopOnKey="3*"
        strictForwardControl="true">
        https://storage.carrierx.com/c/d8b637fa-efa2-4d4d-817a-6b5f7f33e268/no_sleep_podcast.mp3
    </Play>
</Response>
Add Support for Slow Connections
Next, we're going to add some values that will account for slow downloads. Let's add the following attributes:
waitInitial: if the initial download is slow and the initial playback cannot start before this number of seconds,waitInitialUrlwill start playing.waitInitialUrl: the file to play oncewaitInitialhas elapsed.waitRepeat: afterwaitInitialhas elapsed, and if playback still hasn't started after this number of seconds, thewaitRepeatUrlfile will play. This pattern repeats everywaitRepeatseconds until the mainPlaycontent starts.waitRepeatUrl: the file to play forwaitRepeat.
In the following, waitInitialUrl will start playing if the initial playback cannot start and it has been 5 seconds. If 5 seconds has expired and waitInitialUrl has not started playing, waitRepeatUrl will start. waitRepeatUrl will repeat every 15 seconds until Play starts.
<Response>
    <Play
        streaming="true"
        timeLimit="10">
        http://us4.internet-radio.com:8193
    </Play>
    <Play
        background="true">
        https://storage.carrierx.com/c/d8b637fa-efa2-4d4d-817a-6b5f7f33e268/spooky_background.mp3
    </Play>
    <Play
        loop="2"
        loopPause="5">
        https://storage.carrierx.com/c/d8b637fa-efa2-4d4d-817a-6b5f7f33e268/piano.wav
    </Play>
    <Say>
        Once the playback starts, press 9 to hear the options menu.
    </Say>
    <Play
        controlSkip="15"
        forwardOnKey="4"
        informationAudioUrl="https://storage.carrierx.com/c/4e33f4a8-4c04-4da0-9896-9550164ed296/informationAudioUrl.mp3"
        informationOnKey="9"
        pauseAudioUrl="https://storage.carrierx.com/c/4e33f4a8-4c04-4da0-9896-9550164ed296/pauseAudioUrl.mp3"
        pauseOnKey="2"
        preBuffer="5"
        restartOnKey="1"
        rewindOnKey="6"
        skip="2"
        stopOnKey="3*"
        strictForwardControl="true"
        waitInitial="5"
        waitInitialUrl="https://storage.carrierx.com/c/4e33f4a8-4c04-4da0-9896-9550164ed296/waitInitialUrl.mp3"
        waitRepeat="15"
        waitRepeatUrl="https://storage.carrierx.com/c/4e33f4a8-4c04-4da0-9896-9550164ed296/waitRepeatUrl.mp3">
        https://storage.carrierx.com/c/d8b637fa-efa2-4d4d-817a-6b5f7f33e268/no_sleep_podcast.mp3
    </Play>
</Response>
Add Links to More FlexML Instructions
Finally, we are going to add a link that enables our app to access more FlexML instructions. We're also going to add error handling. First, let's set up a second route for our Flask server. We called this route action and it will return the FlexML instructions kept in our action.xml file.
from flask import Flask, request
app = Flask(__name__, static_url_path='')

@app.route("/", methods=["GET", "POST"])
def home():
    return app.send_static_file('instruct.xml')

@app.route("/action", methods=["GET", "POST"])
def action():
    return app.send_static_file('action.xml')

if __name__ == '__main__':
    app.run(debug=True)
The JSON received during requests will include the following fields that provide you with useful information during testing.
{
    "AccountSid": "",
    "ApiVersion": "2.0",
    "CallerName": "",
    "CallSid": "4f0d84c72ff90967f58351cbe8364a77",
    "Digits": "",
    "Direction": "inbound",
    "From": "19093189030",
    "OriginalFrom": "+19093189030",
    "OriginalTo": "19093189029",
    "PlaybackUrl": "https://storage.carrierx.com/c/d8b637fa-efa2-4d4d-817a-6b5f7f33e268/no_sleep_podcast.mp3",
    "PlayOffset": 6,
    "RequestUrl": "https://4146-188-2-25-253.ngrok-free.app",
    "To": "19093189029"
}
The following is further information about the Digits, PlaybackUrl, and PlayOffset fields included in the JSON response above.
| Attribute | Description |
|---|---|
| Digits | If the playback was stopped due to stopOnKey, this is the key that triggered the end of the playback. If the playback ended without being stopped by a DTMF key, this field will be empty. |
| PlaybackUrl | The URL that was being played. |
| PlayOffset | The playback position in seconds when the file was stopped. If the file played to completion, this value will equal the total duration of the file in seconds. |
Add Actions and Callback URLs
Now let's head back to our instruct.xml file to add some more instructions. Include the attributes below to your app:
action: the URL containing the executable FlexML instructions that will be requested after thePlayfile ends or has been stopped by entering the value ofstopOnKey. We've assigned the value as/action, or the new route that we established above.errorAction: the URL containing the executable FlexML instructions that will be requested if thePlayfile fails.errorMethod: the method used to request theerrorActionURL containing the executable FlexML instructions if thePlayfile fails.method: the HTTP method used to execute the request to theactionURL. This method can be eitherPOSTorGET.
In the following, the code will make a POST request to the action URL after the Play file ends. In our example, a request will be made to the /action route that we created.
If the Play file fails to play entirely, a POST request will be made to errorAction.
<Response>
    <Play
        streaming="true"
        timeLimit="10">
        http://us4.internet-radio.com:8193
    </Play>
    <Play
        background="true">
        https://storage.carrierx.com/c/d8b637fa-efa2-4d4d-817a-6b5f7f33e268/spooky_background.mp3
    </Play>
    <Play
        loop="2"
        loopPause="5">
        https://storage.carrierx.com/c/d8b637fa-efa2-4d4d-817a-6b5f7f33e268/piano.wav
    </Play>
    <Say>
        Once the playback starts, press 9 to hear the options menu.
    </Say>
    <Play
        action="/action"
        controlSkip="15"
        errorAction="/errorAction"
        errorMethod="POST"
        forwardOnKey="4"
        informationAudioUrl="https://storage.carrierx.com/c/4e33f4a8-4c04-4da0-9896-9550164ed296/informationAudioUrl.mp3"
        informationOnKey="9"
        method="POST"
        pauseAudioUrl="https://storage.carrierx.com/c/4e33f4a8-4c04-4da0-9896-9550164ed296/pauseAudioUrl.mp3"
        pauseOnKey="2"
        preBuffer="5"
        restartOnKey="1"
        rewindOnKey="6"
        skip="2"
        stopOnKey="3*"
        strictForwardControl="true"
        waitInitial="5"
        waitInitialUrl="https://storage.carrierx.com/c/4e33f4a8-4c04-4da0-9896-9550164ed296/waitInitialUrl.mp3"
        waitRepeat="15"
        waitRepeatUrl="https://storage.carrierx.com/c/4e33f4a8-4c04-4da0-9896-9550164ed296/waitRepeatUrl.mp3">
        https://storage.carrierx.com/c/d8b637fa-efa2-4d4d-817a-6b5f7f33e268/no_sleep_podcast.mp3
    </Play>
</Response>
Now, test your application by calling your rented phone number and using the commands we created!
Next Steps
You've built an advanced Play application using all available attributes for the Play verb! For more information about the FlexML Play attributes, refer to the FlexML Documentation.
Once you have finished your advanced Play application, consider adding functionality using other verbs. See the FlexML Syntax section of the FlexML documentation for a comprehensive list of verbs.