Getting Started
Where Do I Start?
If you want to find out how the API works, we suggest that you start with our Basics section.
As all the methods used with CarrierX API require authentication, you should really start with registering and obtaining your credentials and authentication token. The next thing your will need is to rent a phone number (DID) that will be used as an intermediary between regular phones and voice applications.
Follow the steps below to learn how this can be done.
Step 1. Registering with CarrierX
The easiest way to register with CarrierX is to use the Contact Us form. Fill in all the fields and describe a reason for the contact.
You will receive an email with credentials allowing you to access the CarrierX portal. The link in the email will direct you to the portal. You can also access it using the portal address. Log into the portal and proceed to the next step to get your security token.
Step 2. Obtaining an Authentication Token
You can use your credentials with the Core API methods instead of an authentication token. However, using a token protects your login/password combination from an authorized access. Moreover, this token can be withdrawn or replaced with another one at any time without affecting your credentials. That is why we strongly recommend that you use an authentication token with CarrierX API.
- Click Account > Security Tokens. In the upper-right corner, click Add New Token.
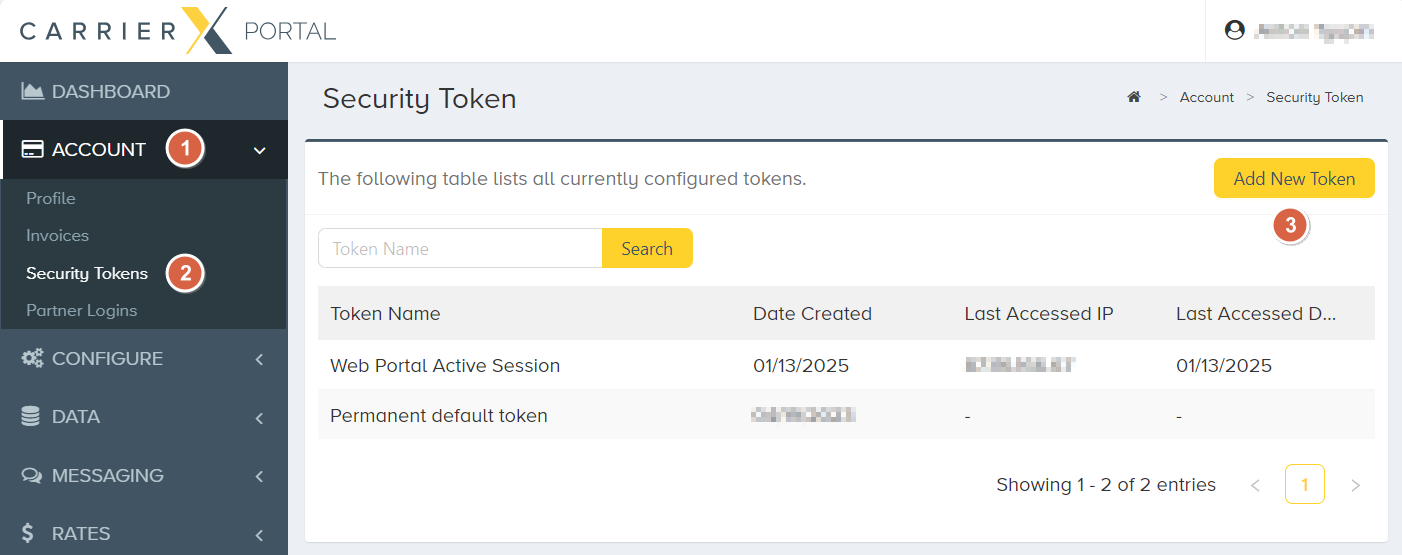
- Enter the token name and click Create Token. A token will be created and added to the list of available tokens.
- Click the token name to view its details. This Access Token is what you need for API access.
- Click reveal to view and copy the access token. This will be used in the
-H 'Authorization: Bearer'header when sending requests to the API.
Step 3. Sending Your First Request
Now you can send a test request to see that everything works as expected. Send the following request:
curl -X GET \
'https://api.carrierx.com/core/v2/oauth/whoami' \
-H 'Authorization: Bearer <YOUR_ACCESS_TOKEN>'
Do not forget to replace the <YOUR_ACCESS_TOKEN> part with the access token your obtained at Step 2.
A successful request will return a 200 response code with data about you as CarrierX partner.
{
    "acls": [],
    "address1": null,
    "address2": null,
    "attributes": {},
    "balance": "351.53",
    "billing_email": "jsmith@freeconferencecall.com",
    "callbacks": {},
    "charge_at": "20",
    "city": null,
    "company_name": "CarrierX",
    "country_code": "USA",
    "date_created": "2018-09-20T21:34:55.000Z",
    "display_id": "CX90576809",
    "login": "johnsmith",
    "name": "John Smith",
    "owner_email": "jsmith@freeconferencecall.com",
    "parent_assigned_acls": [],
    "parent_sid": "ac38746e-d2e2-4cd6-29ae-b6658f0728b6",
    "partner_sid": "ed437907-002d-4ecc-aa3a-efdf5e50dba0",
    "payment_type": "prepay",
    "phonenumber": "5162065319",
    "prepay_amount": "100",
    "available_scopes" : [],
    "spending_limit": "0",
    "state": null,
    "status": "active",
    "system_attributes": {},
    "tech_email": "jsmith@freeconferencecall.com",
    "transformations": [],
    "zip": "90804"
}
Step 4. Renting a Phone Number
Follow the steps of our detailed Rent Phone Number quick start guide to find out how to rent a phone number from CarrierX using the portal or programmatically with the help of the API.
Next Steps
Now you can create an endpoint, add a trunk group with trunks, and associate a phone number with that trunk group.